how to grow grapes Archives

Pruning Thompson Grapes

Pruning your Thompson Seedless grape vine is easy, IF you know what you are doing!

Thompson Seedless is, what we grape growers call it, unfruitful. This means that a Thompson don’t produce grapes from bud 1 to 6 on a shoot. Now, you might think: “My Thompson bears grapes on those buds!”. Yes, that is true, as this is NO rule of thumb, but it is a known fact that the fruit-bearing buds on a Thompson are between bud 8 to 14 (counting from the basilar bud on the shoot).

Normally, you prune the most of the wine grape and table grape varieties, with spurs (3 buds), but in the case of Thompson’s, you will have to cane prune (pruning with long bearers).

It is very important to prune a spur for every cane you prune. This spur is called a renewal spur, and the only reason we prune a renewal spur, is to renew the grape vine next year.

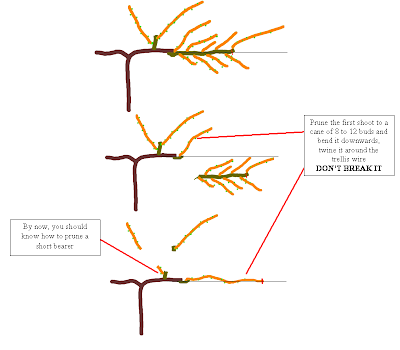
Now this might be a bit vague, trying to explain in words, so I have added some pictures found in the Complete Grape Growers Guide.

If your grape vine was pruned last year, your canes will look something link this. Notice the renewal spur on the frame of the vine. This will stay a spur until you need to use it for renewing the vine. This normally happens when the first few buds on cane of an unfruitful variety (like Thompson’s and Crimson Seedless) does not shoot (sprout).

The following sequence of images will show you how to cane prune your Thompson vine

(Sorry for the quality, but blogger blurs the images when I try to enlarge them, the quality in the

Complete Grape Growers Guide is much better)

Notice how I have removed part of the “framework” of the vine. Next year, the spur will have two sprouts again (remember, you pruned the spur with 2 buds) and the cane will have lots of side shoots again (looking like the first picture).

The whole process starts again!

With a Thompson grape vine, you must choose the canes you will use for your bearers carefully. Those thick, flat-looking canes, with long inter-nodes are normally more unfruitful than canes the diameter of your ring finger (or a bit thicker than a pencil). Choosing the wrong canes, will result in an lower yield, and you will not have enough “wood” next year to choose from when you prune.

I think you realise by now, that if you have pruned your grape vine the correct way last year, the pruning effort this year, will be much easier, ESPECIALLY when cane pruning (like Thompson Seedless).

Some hints when you prune

  • Take time to look over the vine before you start
  • Pick out several well-placed canes that look like good prospects.
  • Cut out old wood and canes that are obviously unsuitable – canes that are small and weak, or too far out from the main trunk. This will clear up some of the confusion as you go.
  • Always leave at least one alternative cane until the last, in case you break one.
  • Bend canes gradually into place before tying. Canes that grow in a direction other than where you want them can often be persuaded to cooperate by cracking them gently. Use both hands to bend the cane at the point where you want it to change direction, and apply pressure just until you hear the fibers crack.

Now this is only an overview of how to prune Thompson Seedless and other unfruitful variates. The Complete Grape Growers Guide goes much deeper into the science of pruning your grape vine.

Have a grape (great) day my friend
Danie
“The Grape Guy”
www.my-grape-vine.com

In order to know what to expect when attempting your own hydroponic garden is to know what a hydroponic garden is. Once you understand what this type of gardening entails, you will be more aware of what to expect when constructing a garden of this nature.

Hydroponics is the practice of growing plants in water without soil, and with the proper nutrients added. This process became considerable popular in recent years, and has been done experimentally for over a century. In the year 1929, new studies regarding the feasibility of hydroponics for growing commercial crops have taken place as well.

Nowadays, many home gardeners and farmers use this technique. This method enables plants to be grown closer together in a field, which helps increase the yield of crops. Not only that, but also several crops can be grown in the same hydroponic growth tank.

As far as what to expect from the process of using the hydroponic technique, you will experience both the advantages and disadvantages of growing crops in this manner. One major advantage of hydroponics (besides conserving space) is that it virtually eliminates all weed and pest problems. It is another form of pesticide-free gardening, in some cases.

The major disadvantage of hydronponics is that the equipment used to garden using this methods is very expensive. You will also need to be prepared to provide extensive physical support for your plants when grown by this method. However, this growing method for the most part can benefit many gardeners and crop producers in many ways, if they know how to do it correctly. Those who are successful at this type of gardening can expect nothing but a rich harvest.

Another big advantage for small-scale hydronponic gardeners is the opportunity to grow plants year-round. This can be accomplished by the use of indoor lighting. The correct type of lighting that you would need for growing plants indoors using the hydronponic method would be a High Intensity Discharge (H.I.D.) light. These types of lights are designed to give off the correct spectrum of light waves, which are perfect for growing plants indoors-and in water no less.

The basic hydronponic growing system includes a variety of other components as well. For example, hydroponic-grown plants are held upright by wire supports or are rooted in substances such as sand or gravel. Furthermore, the growing environment for hydronponic-grown plants needs to be as sterile as possible for best results.

To get you started on using the hydroponic system you will need to keep in mind a few tips. For example, if you want to plant a spring garden, there are some things you will need to know, such as the effect of germinating your seeds ahead of time.

In order to germinate your growing seeds you can grow them a month early with an indoor grow light, and wait until after the last projected frost date to transplant it. Even if you decide to transplant your indoor plants outdoors, you will enjoy a longer production and/or blooming season.

The nutrient solutions added to plants grown by the hydronponic method require the correct concentration of various nutrients such as nitrogen, phosphorous, potassium, and other nutrients that most plants need. One recommendation for growing plants indoors is to add liquid seaweed to them, which also supplies necessary ingredients to plants.

Other names for hydronponics are soilless culture, chemiculture, and water gardening. This type of growing has impressed many people during the experimental phase and is becoming more and more of a successful form of gardening. It is one way of producing organic foods on a larger scale as well.

Now that you know a little more about hydroponics and what to expect from attempting to construct a hydroponic garden it may be time for you to try it for yourself. You have plenty of free resources available to you online to help you get started. In addition, you can refer back to this article.

If you ever have any questions about the hydroponic growing process you can contact gardening or farming expert. They will help direct you to all the information and resources that you need to help you along.

To find out more about hydroponics click on the book

Laying out your vineyard

Hello grape fans!

Here is how to lay out your vineyard for optimum production, pest control, grape coloring and for best airflow through the vines.
Spacing:
I get lots of question about the spacing of the vines (in the row and between the rows). Now, there isn’t really something like wrong spacing between vines, but there are a few factors to take into consideration when planing your grape vine.
For bunch grapes, the most commonly used spacing is 7.5 to 8 feet between vines and 8 to 12 feet between rows. If you use implements like tractor and mowers in your vineyards, you need to plant the rows wide enough for the implements to be able to move between the rows.

On my farm, I use Slanted Trellis systems, and therefore I row widths of 3 meters (10 feet) rows – remember this is for bunch grapes. Here is a picture from the Complete Grape Growers Guide.

Another big factor that will determine the row spacing is the way you train your grape vine. Using a Four Cane Kniffen training system, takes up less space between the rows than say a Geneva Double Curtain training system, therefore the rows don’t need to be as wide.
Geneva double curtain

Four Cane Kniffen

When you look at how vigorous your variaty grows, this will also influence your decision on row width. Vigorous varieties should be planted further appart between vines and the rows should be a bit wider as well.

The way you prune your grape vine will also determine the spacing between vines. When you prune with canes, you must plant your vines far enough apart (at least 8 feet) so that you can twine the canes on the trellis wires without overlapping the adjacent vine’s canes.

Row direction:

The effect row direction has on the productivity is one of the most common mistakes “newbie” commercial and home grape growers make.

When planning your grape vine, you must always strive to expose as many leaves to direct sunlight as possible. This will ensure optimum photosynthesis, optimum pest control and good coloring of grapes. The prevailing wind direction is also important, especially in wet, humid climates. Planting the grape vine parallel with the prevailing winds, will slow down the wind speed and the evaporation of water from the leaves will be much slower, increasing the chances of diseases.

When you plan to establish your vineyard on a hill, with a slope, you normally plant on the contour of the hill. This is the best way to prevent erosion during heavy rains, BUT planting a vineyard on the contour of a hill, will slow down the movement of cold air through the vineyard, and the danger of cold air getting trapped (like a dam) in the vineyard could lead to cold damage of the vines. Be sure to channel the air out of the vineyard by constructing roads and dead ground at the lowest parts of your vineyard. A bush of forest close to your vineyard, could have the same affect, make sure to funnel the cold air out of the vineyard.

I hope this clears out some questions about row and vine spacing, and some questions about where to grow your grape vine.

For more information on growing grapes, get your copy of the Complete Grape Growers Guide today!

Have a grape (great) day!

Danie

www.my-grape-vine.com

Progress with website

Hello dear grape lovers.

Just a short update on the My-Grape-Vine website.

We are nearing a 1000 subscribers now! Amazing isn’t it!

As promised, I am working on making My-Grape-Vine, the ultimate grape growing website. I’ve added a support page, where you can quickly send any grape growing question to My-Grape-Vine.

The next thing I want to add is the Complete Grape Growing Forum – a forum where you can ask other subscribers (and myself off course) grape growing questions, post your stories and also post some pictures of your grape vine. I think this will be a hit among My-Grape-Viner’s, but still needs some fine tuning – will keep you posted.

By the end of this week, I will start a list cleanup process – we are currently experiencing quite a few bouncing emails due to invalid email addresses. There are several reasons for this, but the main reason is people giving fake email addresses of undeliverable email addresses and off course if someones email address have changed.

The whole idea is to clean up the list so only grape growers who really want to receive the second series of grape growing newsletters will be on the list.

As soon as the forum is online, I will send you guys and girls an email, although it will be after the list cleaning process.

Have a grape (great) weekend

Danie
“The Grape Guy”
www.my-grape-vine.com

Ring-bark a grape vine

Hello GrapeViners,
I have something really interesting to share with you today. Do you know what ring-barking is?
Look at the picture below:
Research has shown that the direction of sap flow in a grape vine is in the direction of the red arrows. Sap from the roots of the vine, goes upwards through the core and young wood, also known as the xylem. It picks up carbohydrates as it moves through the leaves and green parts of the vine and transport it back to the routes and older parts of the vine, through the phloem (inner bark).

What happens is when you ring-bark, is that the phloem is cut off with a ring-bark knife, so the sap flow downwards is much slower and therefore much more carbohydrates is available to the green parts of the vine.

Now, let me just warn you about ring-barking! This is a very delicate procedure and you must cut only the phloem of the stem and do not penetrate the cambium too deep, otherwise you will damage the grape vine – even kill it.

Before ring-barking can take place, you will have to remove the bark from the stem of the grape vine, exposing the inner-bark or phloem (no. 2 in picture). Take a knife and cut through the phloem around the whole ambit of the vine, until you reach the place where you started. The cut should only be deep enough to penetrate the cambium (1-2 mm) – you will see some sap-flow coming from the wound – DO NOT CUT TO DEEP!

Now you probably ask: “Why on earth do you ring-bark?”

Well my grape growing friend, this one of the methods I use to enlarge berry size on varieties like Thompson, Crimson and La Rochelle. The reason you get larger berries lies in the slower or much less carbohydrate flow downwards – does is make sense? More is available to grape clusters!

Have a look at the berry size of this La Rochelle bunch – that’s an average of 28-30 mm (XXL!!)

Picture taken with my cellphone, so the quality isn’t that good – sorry!

When to ring-bark and when not and some important things to remember:

  • Never ring-bark a young vine – the diameter of the vine should be at least 30 mm
  • Always ring-bark a day or two AFTER you watered the vine – this will ensure that the vine can handle the “shock” of ring-barking
  • Never ring-bark a grape vine that struggles to grow – remember you are actually hurting the vine
  • In the picture where the numbers are, 1 was last years’ ring-bark and no 2 this year’s ring-bark. Always ring-bark BELOW the previous year’s ring-bark.
  • Don’t cut to deep – PLEASE
  • Ring-barking shortens the life of a grape vine, so if you aren’t a commercial grape grower, don’t ring-bark (although trying it for one year won’t kill your vine IF it is done correctly)
  • Ring-bark at +- 10mm berry size, just after fruit-set has finished – don’t ring-bark to early, as this will have no effect on the berry size.

You might be wondering what happens to the ring-bark wound you made on the stem of the vine. Yes, it is a wound, but the grape vine has a unique way of healing itself and it is called callusing. Callusing is when the grape vine replace damaged membranes with new ones and if you have a close look at the picture of the ring-bark I made last year, you will notice the callosity that formed on last year’s ring-bark.

OK dear grape growers, know you have some kind of idea what ring-barking is all about. Just remember that this procedure should be done with extreme caution and it is NOT for the novice grape grower.

Take care and I will talk to you soon!

Danie

The Grape Guy

My-Grape-Vine

(Wanna know some more great grape growing techniques? Get you copy of the “Complete Grape Growers Guide” Today!

Succesful cuttings made by Joel!

Hello once again my fellow grape growers and subscribers of My-Grape-Vine!

Today I want to share a fasinating story with you.

It’s about a subsciber of My-Grape-Vine.

Meet Joel (for privacy reasons I will not reveal Joel’s email adress), owner of a dwarf Merlot grape vine (shown in the picture below).

Joel joined My-Grape-Vine in mid December, and bought the Complete Grape Grower’s Guide on 21 December. After quite a few emails, here and forth, sending pictures of the grape vine, me “e-pruning” (nice word isn’t it) the vine and sending it back, Joel decided to make some cuttings from the vine.

Now, Joel lives in the USA, GA and wanted to know how to prune the dwarf vine, so I suggested what I should have done.
To get to the point, Joel made some cuttings from his vine, and with the help of the Complete Grape Growers Guide and a little personal inisiative he succeded in rooting his VERY OWN grape vines!

Well Joel, I personally wants to congratulate you again, as I know how much it means to you, and i want to share this information with all of the subscribers of My-Grape-Vine.
Here are some of the emails we send to each other. Like I always say; “Success can only be found in the actions you take!”

Here is Joel’s story and I quote this:

From Joel:

Well it’s winter time here in Georgia and I didn’t have anything to do except to attempt to root the cuttings from the Dwarf Merlot I showed you. I have not pruned it as yet but I thought it would be cool if I could root the original cuttings I had last fall. I used rooting hormone and placed the pot of cuttings between the furnace and water heater in my basement. Needless to say I was shocked at what I saw one night (See Pictures). I am planning to root the cuttings from the pruning before placing the original plant back out on my deck.

I replied, congratulating ……………

From Joel:

Hey! Hey! Yeah I’m pretty thrilled at the results. I can’t wait to prune the rest of the plant and start some more. Where in the heck am I going to put all these!!!!! LOL Like I said this started out in a pot down in the basement (dark most of the day and not heated) placed between the furnace and water heater (heated??). I placed the plastic bag over the top held by a rubber band. I would pull the bag and rubber band back slightly with two fingers and blow to inflate the bag. I watered the cuttings, from the bottom, by pouring water in the saucer that the pot was sitting in. The soil would gently take up the water and not disturb the rooting hormone like it would if you were watering from the top and allowing the water to leach thru the soil. The best thing about bottom watering is that I did not have to take the bag off every time I wanted to water it. ……………………….

Per your suggestion, I think I will move it to a brighter room. I will begin the hardening process in March prior to planting. I like the rooting platform made from wood and a 10 gal aquarium on the site you have linked from your page. I’ve got an aquarium that has been stored in the basement for years. I think I will try this method for the next cuttings.

Joel Replied:

Hey! Thanks for your time and enthusiasm! I have never met anyone on the internet that has taken so much personal interest in my success as you. It’s very encouraging to say the least. If you give all of your customers/readers the same way you will surely be a whopping success on the internet. You kind of remind me of Steve Irwin. It’s like you are the Crocodile Hunter of the Grape Vine!

Thanks Joel for the kind words, I personally loved Steve and thanks for sharing this interesting story with all of us, and once again – WELL DONE MY FRIEND!

Now, the point I want to make by posting this on my blog is:

  • After you purchase the Complete Grape Growers Guide, I will never just write you off and say “thanks, I’ve got your money, now get the hell out of my life!”. It’s more than just selling the book (by the way, YOU can sell almost anything YOU like on the internet, these days). Your success is just as important to me as it is to you.
  • I am a man of my word; whenever I can help you, I WILL try my very best. Even if it means asking someone else’s opinion (like I’ve done with Grant, another happy owner of The Complete Grape Growers Guide. Grant had some difficulty with his water quality, so I went to see an irrigation specialist in my area, to get more precise info.)

Quote from the closing arguments in the last mail I received from Grant

Thanks again Danie to you and your expert water friend, you have been very helpful. I will be ordering your book and promoting it to other grape growers in my wine region of Western Australia (Geograph).

Regards,

Grant

To all your grape growing success my friends!

Have a grape (great) day!

Danie

Author of the Complete Grape Growers Guide – teaching YOU how to make cuttings, train, prune and grow your very own grape vine!

Please leave your comments on this post,

What is Compost? A good description for compost can be decomposed organic material that is produced when bacteria in soil break down garbage and biodegradable trash, making organic fertilizer.

Gardeners and farmers use compost for soil enrichment. The relatively stable humus material that is produced from a composting process in which bacteria in soil mixed with garbage and degradable trash break down the mixture into organic fertilizer.

Why is compost so important in our everyday grape growing and gardening? I once heard these terms and just love them.

Reduce – Reuse – Recycle

Reduce
Composting reduces the amount of waste each of us sends to the landfill. 30% of the material we send to landfill is organic and could be composted at home. Making your own compost in your backyard will save you hundreds of dollars over a few years. Think about it this way. In the past, organic materials have been dumped in landfills or burned. The more waste there is to remove, the more money has to be spend – simple as that. By making a compost pile, you will reduce the amount of money spend for waste removal by a huge 30%! Did you know that YOU nearly throw away 600 pounds of compostables each and every year!

Reuse
Unfortunately, we humans don’t like to reuse. We rather buy new ones because it’s much easier. Isn’t that true? Why should I even consider making my own compost? I’d rather buy my fertilizer from the nursery down the street. The world is falling apart because of waste we humans dump on landfills. The air is polluted with dangerous toxins we breath every single day of our lives. Not many of us like to go through our garbage to see what is reusable and what not. The best way to overcome this problem is to have a recycle bin in your kitchen, where you can throw away organic waste to be recycled.

Recycle
Every single day we take out the garbage, we take out lots and lots of organic material. So what is organic material and can it be recycled into compost? Let’s have a look. Organic materials include yard debris, wood materials, food and food processing by-products, manure and agricultural residues, land clearing debris, used paper and paper bags, leftovers from last nights party (except for the hangover off course J). All of these products can be recycled in compost that you can use to fertilize your grape vine and your garden!

Did you know that compost is more rich in nutrients than peat moss, we so often use?

The benefits of using compost

Let’s have a look at what compost can do for your grape vine and garden.

Applying finished compost will:

  • return nutrients to the soil,
  • hold moisture in gardens and on lawns,
  • contribute to watershed health by controlling run-off and
  • naturally fertilize your soil and
  • improve and provide structure to the soil.

Inside our soil there are literary millions of organisms at work each day. Each teaspoon of garden soil hosts 100 000 000 (100 mil) bacteria and nearly 800 feet of fungal threats? Improving the organic life inside your soil will:

  • Improve soil drainage
  • Suppress soil-borne plant diseases
  • Improve soil tilth and friability

Loosen heavy clay soils

You must always remember that compost isn’t a fertilizer and nitrogen (N) and phosphorus (P) are mostly in organic forms. Nutrients from compost is slowly released to the grape vine and other plants, therefore it doesn’t leach from the soil as much as normal fertilizers. Compost contains many trace nutrients that are essential for plant growth and for the home grape grower and gardener, this is more than enough for a single year.

Adding compost to your soil

When adding compost to your soil, you must make sure that the compost is well matured. The acquired characteristics of a mature compost or compost pile are:

  • dark brown color
  • it should be a humus like, crumbly and loose texture
  • it must have an earthy smell
  • it should be free of feedstock-readily
  • the size of the mature pile should be 1/3 of the original size

When adding compost, it is best to mix the compost with the top 6 inches of your soil. This will loosen the structure of clayish and compacted soils and will improve the water and nutrient retention of sandy soils.

Making your very own compost isn’t that difficult, but you need to know the basics. Lots of information is available on the Internet, but if you need a hands-on guide to make the worlds best compost I do recommend the following e-book.

Click on the book to get more information

Have a grape (great) day
Danie
“The Grape Guy”
http://www.my-grape-vine.com/

Hi everyone,

Wow, I see it has been more than a week since my previous post!

Here is something to “tickle” your thoughts.

Many home grape growers use the same irrigation system on their grape vines as on their lawns. Decide for yourself if it is wise or not …

Any form of irrigation normally helps the start and spread of nematodes and fungus diseases, but not all irrigation methods has the same effect. Normal sprinkle and drip irrigation will not have a huge effect on the spread of the diseases, if not applied directly on the leaves of the vine.

There are a few factors that influence the effect irrigation has on the spread of diseases. The interaction of the climate created by the water, the pathogen involved, and the grape variety will influence the spread of the disease.

During irrigation, the microclimate surrounding the grape vine, changes. The water reduces the air temperature, especially when sprinkle irrigation is used. The humidity around the vine, increase due to evaporation of water and it is a known fact the increase in humidity will increase the chances of spreading a fungus disease. Watering a grape vine, will increase the vigor of the vine, as we all know and a more vigorous vine will overshadow bunches. It is found that shaded bunches will be more susceptible to grey rot than bunches in direct sunlight, because the circumstances for spore development and spreading is much better.

The presence of downy mildew during the late summer in countries like Australia and South Africa, is mainly because of the effect irrigation has on the micro-climate surrounding the vine, therefore, you need to sustain your fungus spray program as late as possible.

There are three cycles in the life cycle of a fungus; sporation, spreading of spores and finally the germination and establishment of the spores. A fungus disease like downy mildew needs “free water” for the sporation and establishment of the spores to take place and the water drops of sprinkle irrigation or rain, can spread the spores. The germination then takes place when the climate conditions are ideal and spores will form shortly there after. The whole cycle starts over again and this within 48 hours! Nevertheless, with enough spores present, free water and an ideal climate, this disease will spread like a field fire.

When we look at nematodes, very little grape growers actually know the levels of dangerous nematodes (there are good ones present as well) in their soil. Nematodes damage the roots of the grape vine by attaching itself to the roots and sucking juice from it. This will prevent the roots of the vine to function normal. Nematodes can also cause secondary virus infections like fan leave.

In previous years, farmer from California increased the amount of water they give, to compensate for the loss of water and nutrition uptakes, due to fact nematode damage of the roots of the vine. This had a snowball effect, as more water will spread nematodes much quicker. Nowadays, a more regulated watering schedule and the chemical and biological removal of nematodes decreased this problem dramatically. When planting new vines, make sure your soil is free of nematodes, otherwise your vine will never be a healthy vine.

To conclude this article, I want to urge you to never use overhead irrigation (if possible) on grape vines. The disadvantages of using this irrigation system are so many; it will never justify its use. Rather use a drip or micro irrigation system that will not spray the shoots and leaves of the vine.

When fungus diseases are a big problem in your area, try to water your vines very early in the morning or during the evening. This gives the vines time to dry off, before the temperatures will rise to levels where fungus diseases will spread.

Growing grapes in cold climate conditions

As a South African and a professional grape grower, learning about the grape vine each day, is my passion. Therefore I’ve done some research on growing grapes in cold climates, something we, here in South Africa, has little problem with. The only time our vines get cold damage is when there is heavy frost early in spring, after the vines sprouted.

Growing grapes in mild and very cold climates do not differ as much as growing grapes in the tropics, and the pruning methods, training methods we use here in South Africa, are used in very cold climate conditions as well.

However, there are a few things a grape grower must consider or think of, before planting grapes in these very cold conditions.

I will be touching on some cold resistant wine varieties and also what the grapes growers do to protect the grape vines.

What Great Wines are Produced in Cold Climates?

The Grape varieties I am going to talk about are hardy to at least -20F/-28C. The various types include Red, White and Table or Juice Grapes. I will list some of the most popular kinds in each group. The first group is the Red Wines that include such varieties as the Baltica, Landot Noir, Savrevois, St. Croix and Swenson Red. Next we will cover the White Wines. Some of the grapes that are in this group include Alpenglow, Brianna, Edelweiss, Frontenac Gris, LaCrosse, LaCrescent, Prairie Star, Swenson White and Vignoles. As for the final category, which is the Table or Juice variety, they include the Bluebell, King of the North, Reliance, Somerset Seedless, Toldi, Trollhaugen and the Valiant grapes.

What is the main concern with cold weather varieties?

Damage to the crop. We will be taking a quick look at how to notice the most prominent damage to the crop when a frost or freeze has penetrated it. In one case, in Southwest Michigan in 2002, over 95% of the crop that was to produce had most primary growth destroyed by the frost.

But before we move on, lets look at the grape bud. A grape bud, is actually three buds. A primary, secondary and tertiary bud. When the primary shoot, or the bud itself is killed by frost or freeze, the secondary bud will sprout. Secondary and tertiary buds, produce less grapes, and grapes of lower quility, but at least the grapes in 2002 (mentioned aboce) produced some grapes, so the grape growers didn’t have a total crop loss.

Cold damage on buds appears dry and shrunken. After awhile, they will crunch when you pinch them with your fingers. Injury to the plant may also include the vascular tissues of canes, cordons and trunks. In some cases, it may even kill the whole vine. That is what happens when a plant has frost hit it. What happens when a freeze hits the plant or grapes? When a plant is hit by a freeze, you will be able to pick it out clearly. The grapes physical body will look water logged and black. It doesn’t have to be dark black to show signs of the damage.

How does a farmer protect from these conditions?

Location, location, location. That’s what they say about business, movies and networking with people. Well, the same seems to be true for the grape crop and protecting it from the elements.
The types of soil used, the slope of the land and even the drainage all have to be taken into consideration when you decide on how to protect your vineyard in down seasons.
The secondary process is finding a suitable covering to protect your plants. In tests, they have found that good old fashion snow cover and geotextile fabrics worked just fine.

They found that if you use soil to cover the grape vine, will protect the vine from cold damage, but it’s not always possible to remove the whole vine from the trellsi it actually helps to breed more disease and inhibits the following seasons production levels.

It seems that geotextile fabrics work best for tender and semi-hardy varieties. They found that snow cover is best where there is a vine without protection and when pinning half of the canes to the ground. This method is most effective in areas that have good drainage and have a southernly slope to the land.

You should probably use geotextile fabrics for any other produce. Just remove them from the trellis if possible, lay them flat on the ground and use the fabric to cover them for the off season.
Covering the grape vine, will not 100% prevent cold damage, but at least there is a chance you vine will survive and you will have grapes to harvest the year to come.

Danie
“The Grape Guy”

Autor of the Complete Grape Growers Guide – a step by step guide, how to grow grapes.
www.my-grape-vine.com

Grape Pictures

Hello my dear grape growing friends.

As promised, here are some pictures of my harvest.

My Sultana crop – one of the best I’ve had in years
Look at the berry size – amazing isn’t it?
You must know this vineyard! Yes, it’s the one on my website, where you have
registered for My-Grape-Vine

(Red Globe)

Regal Seedless

We have to cut these bunches in half to be able to pack them propperly!
Looks lovely , he?

Those of you who still had doubts about my ability to grow grapes – well, what do you say now?

LOL……… I would love to hear what your comments or questions are about the grapes.
Have a grape (great) day
Danie
Author of “The Complete Grape Growing System” teaching you how to train, prune and grow your grape vine like a pro!

Get your membership for only $29 – click here

 Page 10 of 11  « First  ... « 7  8  9  10  11 »