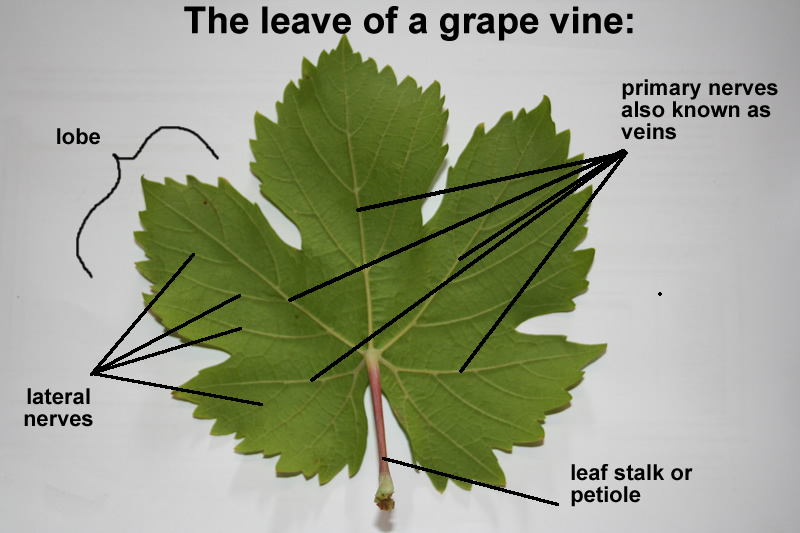
how to grow grapes Archives

Rick’s Grape Vines

Hi Grape Friends,

I received this email from Rick, a member of the Complete Grape Growing System.  From the email he send me, it seems like he knows what to do – how to start constructing the framework of the grape vines, however he ran into some difficulties along the way.

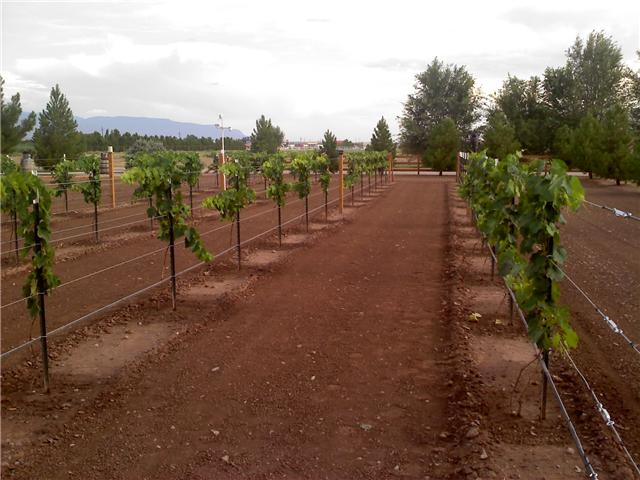
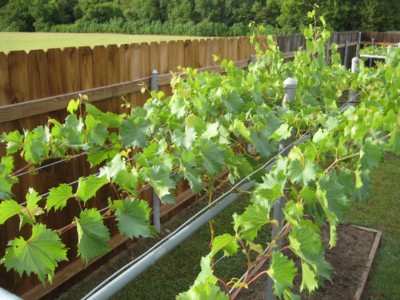
By the way, Rick’s grape vines look great, and it’s always a pleasure to assist you guys wherever (whenever 😐 ) I can.

NOTE:  The text in red, are my replies.

Background info:  I live in _________ , Arizona, USA. We live in a desert and summer temps are extreme. Temps of 110-115 degrees (F) are common in July & August. Our growing season is long lasting from March-November. I just got my first grape plants and I’m hoping to get “first year growth” before night time temps get cold in November.

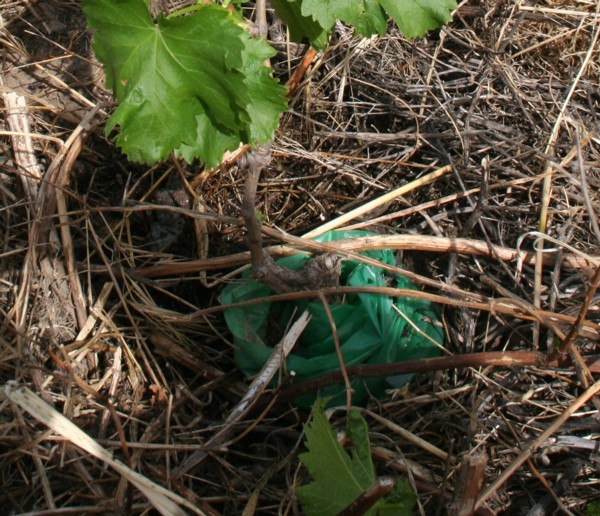
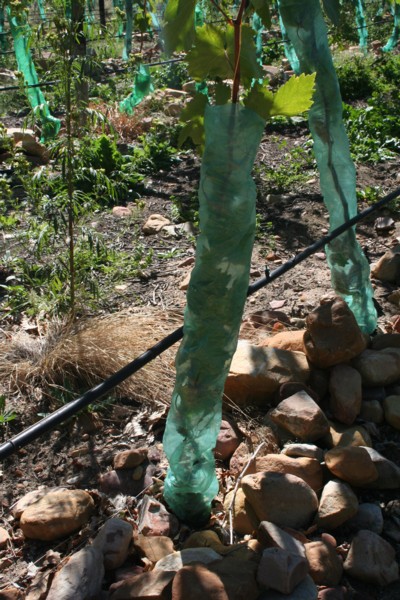
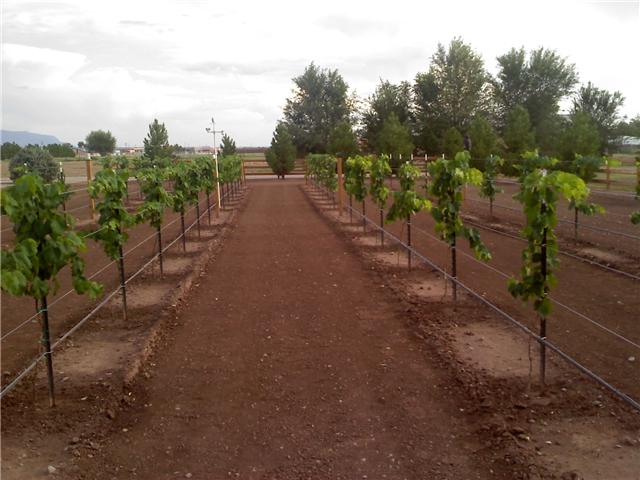
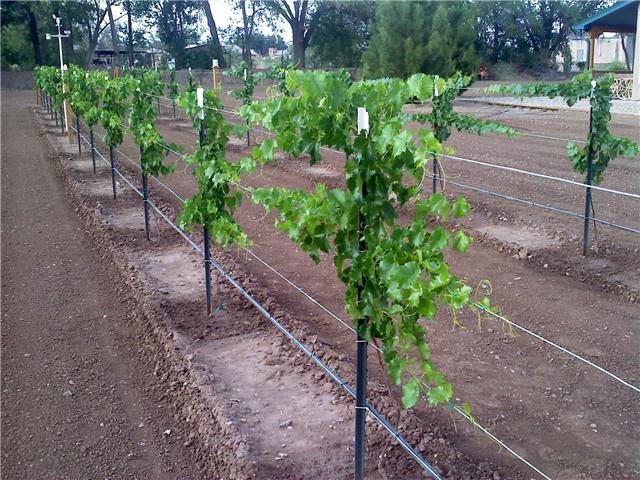
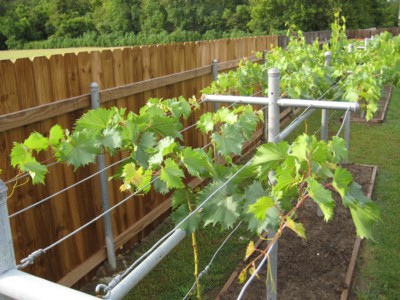
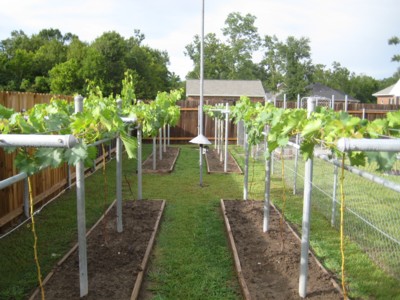
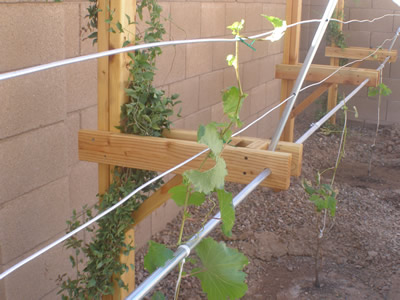
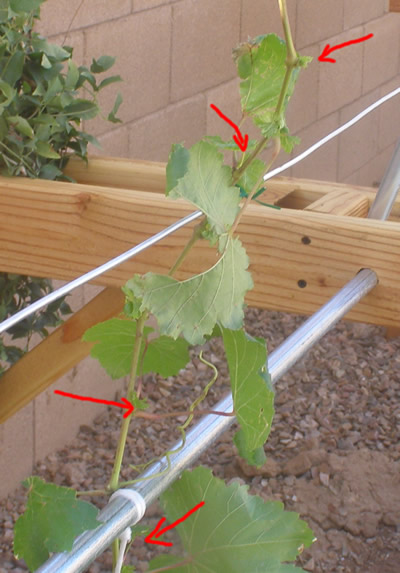
I just got some grape plants and bought your system last week. I’ve modified an existing arbor to accommodate the grapes. The arbor was built to provide mid-day and afternoon shade. I decided to plant grapes there last minute. The plants I was given are very young and some don’t appear to be in very good condition. I have a few questions:(since I took these pictures I’ve pulled the wires tight.)

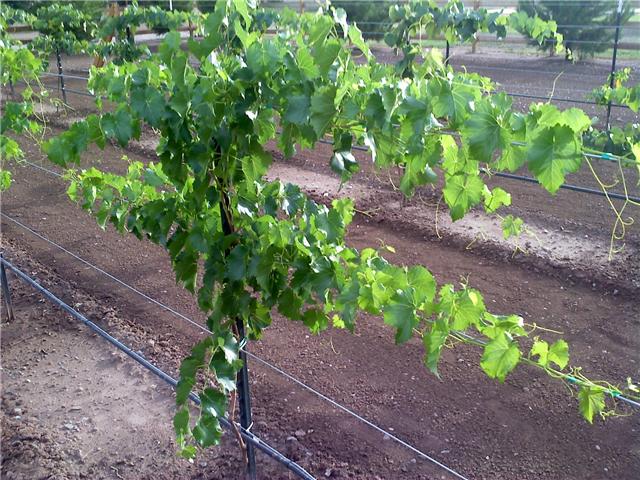
  1. The vine (training shoot) had no growing point when I got it. It’s long enough to reach the first two wires and in the few days since I planted, the buds have begun to sprout. These are going  to be lateral shoots? correct? This is what I want to be happening, correct?

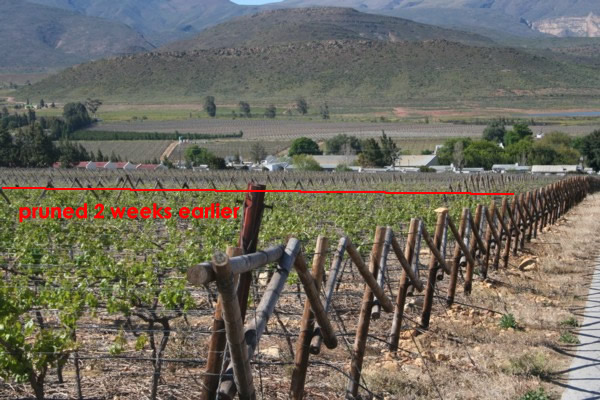
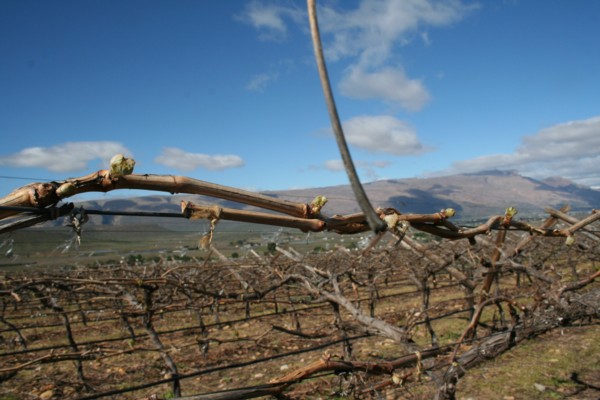
Rick, that is absolutely correct.  These lateral shoots will one day be the cordon or arms on which you will prune the spurs or canes – depending on what pruning method you will choose. I zoomed in on the picture (below), to show you guys what Rick was referring to.  See those small leafs, they will develop into shoots that must be trained on the horizontal trellis wires.

I’m hoping to get lateral shoots to grow out in the next 8 weeks before temps fall. Do you think I’m too late in the season?

No, I don’t think so.  Since your growing season will be over in November, much growth can still be expected – if you stick to the methods I show in the Grape Growing System.

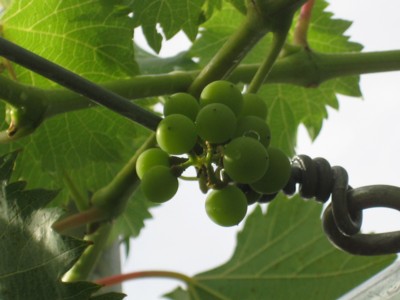
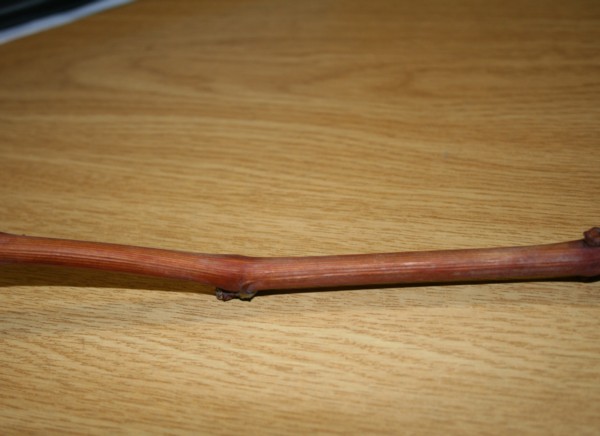
2. The training shoot in the photo (below) had a nice growing point and had added two inches in just a couple days. This morning it was damaged. Will this give me any lateral shoots this season? Or will I have to prune this back in winter and begin again next spring?

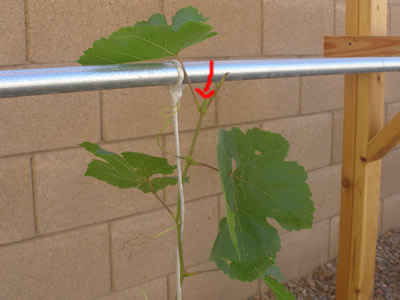
Yes.  See where the red arrow is; this tiny shoot that is developing here, can be used as a new growing point to train your grape vine to the trellis wires.  New lateral shoots below this point will also develop, and can either be removed or used for developing a cordon on the pipe – if that is what you want to do.  Personally I think it is too close to the ground to develop arm here.

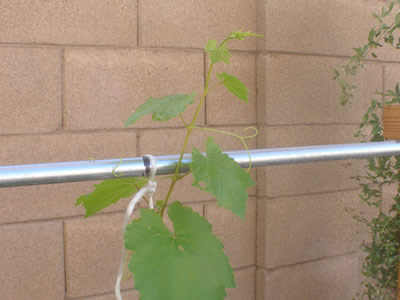
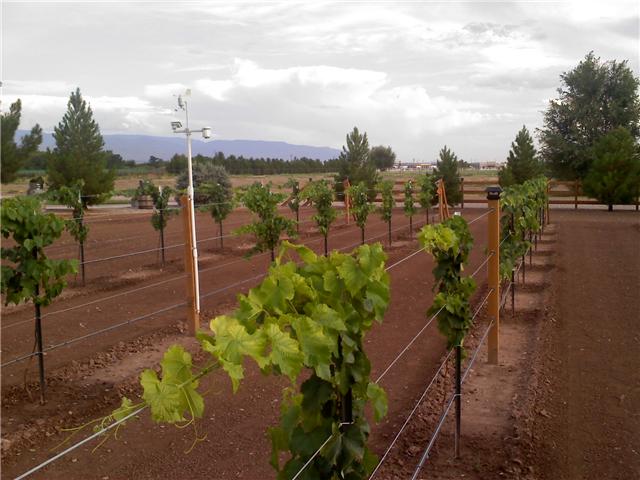
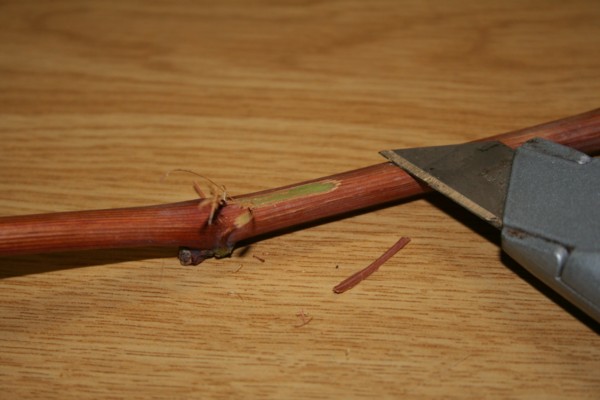
3. Photo shows a nice training shoot with good growing point that has added 2+ inches in the few days since I planted it. The first two wires are 8 & 16 inches above the bar. Should I let it grow taller or pinch off the growing point and hope to develop a few lateral shoots in the next 8 weeks?

Rick, as shown in the Complete Grape Growing System, you will have to let the vine grow pass the top wire and then remove the growing point, so lateral shoots can develop.  These lateral shoots will be used to cover the trellis wires.

Thanks for any info/advice you can give me.

I’ve spent hours reading and re-reading your e-book this past week and I’m really excited to begin my little vineyard.

Rick

Thanks Rick for sharing your pictures with us.  If there are any questions, feel free to post a comment on this blog post.

Take care everyone

Danie


Did you find this tips useful?  The Complete Grape Growing System has many more!

For only $29, you get instant access to all the grape growing information you need, PLUS get some bonus videos of how to prune and train a grape vine.

The Complete Grape Growing System is a digital product.  You will not receive any physical products.


Protecting Young Grape Vines From Weed-killers

With this article, I want to show you how you can protect your young grape vines, while spraying weed-killer.

But before we move on:

  • Remember that weed-killer can be harmful.
  • Take note of what weed-killer you use, (contact or systematic)
  • Use properly maintained and calibrated spray equipment
  • Read the instructions on the container label,
  • Ensure that you will not contaminate primary water and food sources
  • Use protective clothing.

With that said …

Weeds are the number one enemy for any young grape vine and we all know that, taking care of unwanted weeds in a newly planted vineyard, can be headache.

If you allow the young grape vine to come in contact with the weed-killer you spray, it will also die or get badly damaged.  The fact remains; we still need to control weeds in newly planted vineyards- period!

Easier said than done, isn’t it!

However, there are a few tricks I will show you how to protect your grape vines while spraying weed-killer.

The first and probably the most important thing to remember, is to kill the weeds before you plant your grape vines.  This will ensure that for the first couple of weeks, your vineyard and young grape vines, will grow without competition for food and water.

However; as the growing season progress, the weeds will start to grow again and this is where the problems start.  With your new vines well established, you cannot simply go out and spray weed-killer again; you need to protect the young grape vines first.

If you grow grapes on small scale, you can simply protect the vines by covering it with a plastic carry-bag, while you spray the weed-killer.  Ensure that the outside of the bag (the area where the weed-killer came in contact with the bag), never touch the vegetative growth of the young grape vine.

The problem starts when you grow grapes on a larger scale.  It is simply impossible to cover every single grape vine with a bag, unless you have the these:

These are called trunk protecting tubes.  Normal growing tubes can also be used, but I personally don’t fancy the use of growing tubes, especially if you are going to leave them on the grape vines.  In our climate, I found that the micro-climate inside the tube, often gets too hot or humid and may damage the foliage or could lead to unwanted diseases.

Once the grape vines are planted and pruned back as described in the Complete Grape Growing System, you simply cut a tube of about 500 to 700mm in length.  Fold the tube into a small circle, that will go around the cutting.  When placing the tube over the cutting, ensure not to damage any buds and new shoots that may have developed from the cutting.

After you have placed the tubes at the base of the cutting, you can tie your training strings to the bottom trellis wire.

When it is time for the weed-killer application, later on in the season, you simply unfold or extract the tube to it’s full length.

Once the spray application is complete, you need to wait a few hours for the weed-killer to dry off, and then again you fold down the tube into a circle and again place it at the base of the cutting.

You can also use plastic covers to keep the weeds away from the cuttings, but I will discuss this in more detail in another blog post.

Neat little trick, isn’t it?

Take care, and happy grape growing…

Danie

www.my-grape-vine.com


Did you like this tip?  The Complete Grape Growing System has many more!


For only $29, you get instant access to all the grape growing information you need, PLUS get some bonus videos of how to prune and train a grape vine.

The Complete Grape Growing System is a digital product.  You will not receive any physical products.

Will pruning a grape vine earlier, advance bud break?

Being working online and offline with thousands of vineyard owners from all over the world, the past four years, I know that this question still remains a mystery.  Well, I’m about to show you proof that early pruning will for sure influence the time of bud break.

During the past dormant season, we started pruning before my staff took their annual vacation.  We stopped pruning one of my Flame Seedless vineyards, halfway through the vineyard, when it was time for them to take their vacation.  After two weeks, we came back and pruned the rest of the vineyard, as well as the rest of my farm.

Now from the pictures below, you can clearly see that the grape vines in the section we pruned two weeks earlier, have develop more leaves and that the shoot length is much longer.

Why?

The buds at the tip of the canes come out of dormancy first.  This is the point where all the enzymes are transported to, as the sap flow in the vine increase.  Obviously, if there are less buds on the cane, more enzymes are available per bud and therefore, the buds will break earlier.

 Early pruning will not necessarily advance the harvest date.  The later vines will catch up, as the season progress, but one thing is for sure; it absolutely does advance bud break.  This is extremely important to know, if you live in a climate where early spring frost is a problem.  If you prune your grape vine too early, your grape vines will break bud too early and will increase the chance of frost damage.

Now the question remains: “When is the best time to prune a grape vine?”  A rule of thumb is, to prune just before natural bud break, but this isn’t always feasible if you have acres of grape vines.   You need to know when bud break occurs in each of the vineyards or on each of your grape vines.  Each year, write down the dates of bud break, as this will give you more or less an idea of when you can expect it next year.  Although the annual climate, snowfall, rain and so on, will influence the actual date of bud break, it will give you more or less an idea of when this will happen.

On the other hand, pruning too late, also has it disadvantages.  If you start pruning too late (after bud bread), you will damage the cracked buds, and new shoots that developed.  If you damage the bud, the secondary bud will have to break to reveal a new shoot, and this will influence your crop size.

Remember; after pruning, the canes are twisted and secured around the trellis wires.  If there are small shoots and cracked buds on this cane, you will damage them, no matter how careful you work.

To sum up this article:

  • Early pruning does advance bud break, but not necessarily harvest date
  • Do not prune too early if your location is known for heavy spring frost
  • Write down the dates of bud break so you will know when to expect it
  • Do not prune too late as well, as the chances of you damaging the buds and shoots is much higher.

Know you vineyard, know your climate and you will know when to prune.

Good luck and hopefully this article shed some light on the correct pruning date for your vineyard.

Danie

www.my-grape-vine.com


Pruning your grape vine is one of the most important aspects of growing a grape vine the correct way.  Learn how, with the Complete Grape Growing System.


For only $29, you get instant access to all the grape growing information you need, PLUS get some bonus videos of how to prune and train a grape vine.

The Complete Grape Growing System is a digital product.  You will not receive any physical products.

Scott’s One Year Old Grape Vine Pictures

Hi friends, I hope you are all well.

In a previous post I asked what I can do to improve this blog, and quite a few of you asked if I can upload some pictures of subsribers’ vineyards.

I just received these ones from Scott and I must say: “This is IMPRESSIVE results!”

Scott, became a member of the Complete Grape Growing System in February this year, and followed the grape growing information from the system to achieve these results!

I must admit, I’m so proud of him!  LOL 🙂 

Scott has done a great job and so can you.  These pictures proof that you CAN be a successful grape grower if you use the right techniques – I say no more … have a look and decide for yourself

Scott’s One Year Old Grape Vines

You too can achieve these results!

Secure your spot in the Complete Grape Growing System Right Now  – Click Here

Thanks Scott for sharing your pictures with us and again, congratulations on establishing such a fine looking vineyard.  Please keep us updated on your progress.

WOW, isn’t that a great looking vineyard?  I just wish I could see it in person – maybe one-day! 🙂

Thanks for reading and enjoy your weekend.

Danie

www.my-grape-vine.com


Would you like to grow a vineyard like this?

I told you it can be done in one year, but you didn’t believe me! LOL  🙂

It’s time to get to work!


The Complete Grape Growing System is an online product and you will NOT receive a physical product.  All the information is available immediately for download, after you ordered the product. 

You will only be charged US$29 (or your own currency converted) once

Growing Grapes In Shallow Soil

This seems to be a topic of great concern to many vineyard owners all over the world, and there is a good reason for that as well.  A too shallow soil will for sure have an influence on how well your grape vine grows and how productive the vines will be.

To determine if your soil is too shallow for growing grapes, you need to know what the roots of the grape vine look like and how the root system develops over the years.  Another very important fact to keep in mind is that a grape vine don’t like wet feet.  In other words, the grape vine’s roots must develop in a well-drained soil with enough oxygen for normal nutrient uptake.  I wrote an article about this a while ago, so if you are interested, head over to the following web page:  The Importance Of Oxygen In The Soil When Growing Grapes 

With that said, what does the root system of a grape vine look like? 

On deep soil, the roots of a well developed grape vine can easily reach a depth of 15 feet and spread like a fan.  On the other hand, grape vines that grow on compacted soils or soils with an impenetrable layer, have roots that are poorly distributed, shallow, and stubby ended and grow horizontally, rather than downwards.

The optimum soil depth is about 2 meters or 6 feet and deeper.  The most active roots for food uptake are found in the top 600 to 800 mm (2 to 3 feet).  The roots below this area is responsible for oxygen intake and other respiratory actions.  Any shallower soil, will prevent proper root development.  However, this doesn’t mean you cannot grow grapes on a 1.5 meter deep soil.  There are vineyards that produce a reasonable crop on 4 to 5 feet deep soils, but I would say that 4 feet is about the minimum depth for growing grapes.

What will determine the depth of your soil.

Basically there are three types of obstacles that will determine the soil depth.  The first, and most obvious, is an impenetrable layer of rock (reef) or clay.  If possible, the reef can be cracked with a bulldozer and toe-plough, that enables the roots to grow down in the cracked reef.  To obtain the best results, it’s best to plough the land sideways and from top to bottom – this however is pretty expensive!

The second, and less obvious is a high water table.  If you live in an area where the water table is close to the surface of the soil, you can know for sure that the roots of the grape vine will not grow below that point.  There’s not much you can do about lowering the water table, except if can install a drain system, that will channel the water away from your grape vines – again, this is pretty expensive as well.

The third and probably the least obvious is an impenetrable chemical layer.  A chemical layer normally consist of a layer of soil with a very high or low pH, but can also be a layer of salt, because of year and years of fertilizing a soil, without proper soil management.  The roots of the grape vine will avoid these layers and rather grow sideways than into them.  Correcting these layers can be done with proper soil analyses and soil preparation and management.

My viticulture lecturer in collage, always said that the root system of a grape vine, will be as big as the canopy above – interesting statement isn’t it, but that’s why a too shallow soil will prevent good canopy development.

If there’s not much you can do to increase the soil depth of your vineyard, there is one final thing you can do before planting your grape vines – it’s called ridging.

Like farmers ridge potato lands, a vineyard can also be ridged (just on a bigger scale).  Ridging the soil along the length of the planting row, will increase the soil depth with about six to twelve inches.  I know this is not much, but could be enough to ensure a better root development.

Unfortunately I don’t have a picture of a ridged vineyard right now, but I will try to upload one soon.  The ridges are about 8 to 10 inches high and about 4 to 5 feet wide and stretch from where the one end post will be planted, to the other – in other words, ridging should be done BEFORE planting your end post or canopy support posts..  The most practical way make a ridge, is to use turn plough several times on the same row or with a back-hoe.  Just ensure the plateau, where you will plant the vines and posts, is more or less lever.

Off course ridging has many disadvantages as well, such as …

  • Ridged soils will dry out quicker because of a bigger soil surface exposed to sunlight and wind.
  • Normally, the planting rows need to be wider to make space for tractor movement between two adjacent ridges.
  • Working (harvesting, thinning out bunches, suckering etc.) in ridged vineyards will be much harder, as the canopy will be higher above the normal ground level.
  • Weed control is more difficult because of the higher planting row.
  • Expensive way or soil preparation

Hopefully, with these tips you will know what to do.

Good luck and happy grape growing my friends

Danie

www.my-grape-vine.com

 For the most complete grape growing reference and training manual out there,online and off-line, join the Complete Grape Growing System today.

The complete grape growing system is an online membership site,where you get instant access to all the grape

growing info needed to help you succeed.
Join now for only US$29 (or pay in your own currency).
All transactions are securely handled by Clickbank

Growing Jim’s Grape Vine

Hi again friends.

Yes, it’s time for a new grape vine training video! 🙂

Jim, a member of The Complete Grape Growing System, send me an email a few days ago, asking some assistance with how to train his grape vine on his pergola.  I made this video an uploaded it; maybe you can learn something from it as well – hope so!

Anyway, the size video is about 30 MB, so it may take some time to load with slower internet connections.

Good luck and most of all – enjoy it!


Take care

Danie

www.my-grape-vine.com

Join the Complete Grape Growing System Today and learn how to make YOUR grape vine stand out above the rest!

For a once-off fee of just $29

I Need Your Feedback Please

Hi again friends,

Welcome back to www.My-Grape-Vine.com ‘s blog.

This is not a regular grape growing blog post as usual, but rather a cry for help :-).  Yes, I need your feedback on how I can improve your learning experience at My Grape Vine.  The Internet is a wonder on it’s one, but it’s still a “cold” way of communicating with people.  Email is becoming more and more unreliable and with all the junk that fill our in-boxes, it’s really not easy sifting out what’s junk and what was send from a person who really needs help.

I always dreamt of, and tried to make it a bit more personal, like the addition this blog, where I can directly reply to some of the question grape growers have.  As you can imagine, it is nearly impossible to answer all, although I try my best. 
 
Any suggestions are welcome, as long as they related to grape growing and off course feasible – simply reply to this post below

Please, take some time to think this over and don’t repeat a suggestion someone else already made.  You can show your support for an already suggested topic by replying to that specific reply.

Thanks for your precious time …

Ready for a success story?

I received the following pictures from Jacques, a member of The Grape Growing System.  He owns a small vineyard in Louisiana and used the Grape Growing System for the past year with GREAT success!  Jacques, I hope you are reading this and thanks for sending me the pictures and WELL DONE MY FRIEND! 


Notice how the well the above vineyard develops …

Great training techniques Jacques – good job!

Hopefully next year you will have a truck load full of this …

Here is the email from Jacques (please note I have deleted some private details from the email).


Hi Danie,

Just want to say thanks and send some pictures of my vines. Down in xxxxxxxxx Louisiana, July and August bringsrain and high humidity. Your CD (ed.  he probably wrote the files he downloaded to a CD) has helped me and my 1st year vines do very well.

I can’t wait for next summer to see if the grapes will do as well as the vines.

Thanks, Jacques xxxxxxxxxx

xxxxxxxxxxxx, La


Would you like to grow a vineyard like this?

I told you it can be done in one year, but you didn’t believe me! LOL  🙂

It’s time to get to work!

The Complete Grape Growing System is an online product and you will NOT receive a physical product.  All the information is available immediately for download, after you ordered the product.  You will only be charged US$29 (or your own currency converted) once, with no further payments or any hidden costs – GUARANTEED.


Get it now!

Hi my grape growing friends.

Wow!  It’s middle June already; can you believe it!  For you guys in the northern hemisphere, your grape vines should be well developed by now, with some varieties already in flowering.  

Here in South Africa, we are preparing for pruning the early varieties by the end of the week. 

But this is not what this article is about!  I received an email from one of the members, who joined My Grape Vine in first year we went online, way back in 2006. 

Here is her email:

Danie, I’ve been a member of My Grape Vine since who knows when? And I’ve been following your grape growing techniques by the book.  I must admit, I still need to learn allot, but your program and emails (and blog updates) are simply amazing.

I know you get allot of email questions and I will understand if you do not reply to this one, but what I would like to know is; what are five most important things to do, to make my grape vines stand out above the rest?”

Thanks for your time and effort

Chantal


The five most important things?  Mmmmm, okay the first thing that comes to mind is, and that is probably the most important is:


  1. Choosing the right grape variety:  I would say 40% of your success depends on what variety you choose.  This is particularly important if you live and a cold climate where winter temperatures drop below freezing or if you live in a tropical climate, where rain often occur during the growing season.  Remember, some varieties are more susceptible to cold damage and diseases, than others.
  2. The second thing that comes to mind is; pruning.  Without pruning your grape vine, you will never be a successful grape grower – period.  Now, pruning a grape vine is a complex and often hard to understand subject for new grape growers, but once you’ve done it like it is suppose to be done, you WILL see a huge difference in the way your grape vine grows and you WILL have more fruit for sure!
  3. Training and developing the structure (framework) of your grape vine.  Forming a correct framework of your grape vine will improve the overall performance of your grape vine tremendously.  A properly developed grape vine, will ensure good sunlight and air penetration into the vine.  This is particularly important for disease control and fruitfulness.  DO NOT UNDERESTIMATE THE IMPORTANCE OF PROPERLY TRAINING YOUR GRAPE VINE!
  4. Keeping diseases under control.  Now, this is easier said than done, especially if you try to grow your grape vines organically and you live in a hot, humid climate.  Although there are excellent fungus and pest control products on the market, the timing of your spray application, as well as managing the canopy of the vineyard is more important.  Remember that prevention is better than cure!
  5. The last but not the least is; summer treatments or growing season treatments for your grape vine.  Growing grapes of good quality, all comes down to managing the grape vine canopy.  After choosing the right variety, I would say that this is the second most important aspect of growing grapes.  Things like removing water shoots, leaf pulling, suckering, tying down shoots, crop size management and cluster thinning are all part of this process.  Without managing the canopy, your grape vine will not stand out above the rest!

Okay, so now you have my opinion what the five most important aspects of growing a grape vine is.  I see you frowning; what about fertilizing and watering?  Yes, they are important, but the above is more important. 

Take care and happy grape growing

Join the Complete Grape Growing System Today and learn how to make YOUR grape vine stand out above the rest!

For a once-off fee of just $29

NOTE:The Complete Grape Growing System is an online product and you will not recieve a physical product.  All the information is available for download from the membership site.

I often receive questions about why the leaves of a grape vine turn yellow long before fall.

Although there are about 20 reasons why these symptoms show on leaves, I think the most common reason for yellowish leaves on a grape vine, is Magnesium (Mg) deficiency.

Not all grape vines show symptoms of Magnesium deficiency, but it is becoming more and more evident in vineyards as we learn more about the importance of Magnesium for optimum grape quality.

What is the function of Magnesium in a grape vine?

Magnesium form part of the chlorophyll molecule.  As you can recall from school, chlorophyll is a green pigment found in most plants, hence the green colour of chlorophyll-containing tissues such as the leaves of your grape vine.

As we all know by now; the leaves (and green parts) of the grape vine is where the carbohydrates are manufactured and transported to the rest of the grape vine.  These carbohydrates are necessary for optimum growth, the immunity of the grape vine and for the proper development of the berries.

The symptoms of Magnesium deficiency:

More often, the symptoms of Magnesium deficiency is overlooked when growing black or red grapes, as white varieties show Magnesium shortages more prominent.


Deficiency symptoms are seen on the older basal leaves and start with leaf margin yellowing that moves inward. The leaf veins stay green the longest and the areas between become pale green and often creamy white. In red grapes, there may be a reddish colouring that develops between the veins (like the picture below).


  If you are not familliar with these terms, have a look at the picture below:


Not only does Magnesium deficiency affect the leaves and the manufacturing of carbohydrates, but it can also lead to premature fruit drop at harvest (more reason to keep a look out for the symptoms!).

How to correct Magnesium deficiency:

The most common mistake grape growers make, when they diagnose a grape vine with a Magnesium deficiency, is add tons of Magnesium to the soil or foliar.

Over the past 20 years I have been growing grapes, I have found that most of the time, it is not a shortage of Magnesium that cause the problems (symptoms), but more often it is a pH problem or Potassium (K) / Magnesium imbalance.

The problem starts when you are growing grapes on more acid soils.  Magnesium is tied up to the soil particles of acid soils and become more and more unavailable to the grape vines, the lower the pH gets.

Now, the first thing you do before planting your grape vine, is to correct (raise) the pH of these soil, right?  But most of the times, grape growers don’t take into account that by adding elements like lime and Potassium to correct the pH, it can cause even more Magnesium to become unavailable to the plants!

Soils with very high levels of Potassium (K) (many of the organic growers will have this problem), will have little available Magnesium.  Why?  Because Potassium will displace Magnesium cations (Mg ++), making less  Mg anions available to the plant.

In other words, if you have a low pH soil (below 5.5 pH), and you want to raise the pH without binding the Magnesium, you should apply dolomitic lime (high in magnesium) at the rate of two to four tons per acre – BUT before you run out to by some lime, I do recommend you let your soil be analyzed first.  Magnesium soil test values between 100-250 ppm are considered adequate for growing grapes.

If the Magnesium deficiency symptoms are picked up during the growing season (normally between flowering and veraison), a petiole analysis (leave stalk analysis) of the grape vine is the right way to determine what is going on inside the grape vine.  A foliar spray of Magnesium sulphate will temporary correct the issue.  The most common recommendations are 15.0 to 20.0 lb. of magnesium sulfate/100 gal. sprayed as a dilute spray at 200 gal./acre.


Then again; get your vineyard soil analyzed do the corrections there, as Epson salt can cause foliar and fruit damage if mixed with other products.

 I hope that this article shed some light on the subject of the importance of Magnesium when growing your grape vines.


Have an excellent day my friend!

Danie

www.my-grape-vine.com


P.S.  Did you like this tip? 

Join the more than 2000 happy grape growers by becomming a member of the Complete Grape Growing System Today!

Are My Grape Cuttings Still Alive?

Hi friends, I hope you had a wonderful week!

This is now the second post, where we take our 2009 growing season in retrospect and since we had some problems with cuttings we bought last year, I thought it would be a good idea to include this post.

This week I will try to answer a question I so often get from growers all over the world – 

“How do I know if my grape cuttings are still alive?”

In the picture below is a cutting that looks dead;  with a brown, corky bark and no signs of life.  For someone with little or no grape growing experience, this will for sure be the case, but I guarantee you that it is still alive!

How can I be sure?

Take a sharp carpet or pocket-knife and scrape the bark from the cutting to reveal the cambium (the thin layer just beneath the bark). IMPORTANT: DO NOT CUT THE CUTTING, simply scrape off the bark, otherwise you may damage the grape cutting and it will not be your grape vine one day!


From the picture below, you can see that the cambium is a dark green colour.  This is your proof that the cutting is still alive. 


If the colour of the cambium is a pale green of brown, it means that the cutting is either dying or dead already.

Okay, I hope you find this info helpful and that from now on, you will not wonder if the cuttings you are about to plant is still alive.

Take care and happy grape growing.

Danie

www.my-grape-vine.com

P.S.  Did you like this tip?  This is just the tip of the iceberg! 

For a Complete Grape Growing Course, join the Complete Grape Growing System Today for only $29!

 Page 3 of 11 « 1  2  3  4  5 » ...  Last »