As the new grape grower learns more and more about the grape vine and how to develop a grape vine cordon or arms, they normally face a gigantic task of pruning away hundreds of canes and old wood.

If you have a neglected or overgrown (call it what you want) grape vine, there is only one way to “reconstruct” the grape vine and that is to prune back hard – really hard. The next question I get is: “How hard is really hard?”.

To be honest, you will not like what I am going to tell you now!

If your vine has some kind of structure (usable I must ad), and a relative straight trunk, then you can try and structure the vine from a few one year old canes and remove all the old wood and unusable canes. Even if you have to prune back so that only the trunk and a few canes are kept, that is OK too, because this gives you the opportunity to start all over again – the correct way.

If your grape vine don’t have a usable structure at all and many trunks without usable one year old canes, then it is best to prune back the whole grape vine to one usable trunk and to keep only one healthy cane that you can tie to the trellis or support wire.

The worst case scenario is when your grape vine has no structure at all and no main trunk to speak of, then most of the time it is best to cut off the vine just above ground level. And NO, this will not kill the vine, in fact the vine will probably reach and cover the trellis within one season, because of the vigor from a well developed root system that is all available to the new growth. You might think that I’ve gone mad, I know, but trust me on this.

If you have no clue where to begin and if your vine is a real mess, then cutting the wine back to the ground, is probably the best option for you. Off course your grape vine will not bear fruit next year (or very little fruit), but you can start a new grape vine and train this new vine the correct way. If you have a grafted vine, then you must cut back the vine at least six inches above the graft union – remember this! We allow this 6 inches to prevent the graft union from drying out.

A week or so ago, on the 9th of August to be exact, I posted a blog about Leslie’s grape vine and how she managed to reconstruct her grape vine. I received a few emails from subscribers of My-Grape-Vine asking me how she did that, so I have decided to post the pictures and emails we send eachother: Here we go.

The first picture I received from her asking help.
As you can see, this grape vine (Black Hamburgh) is a real mess.
Notice the multiple trunks and tangled canes all over the place!
Here is the email from her:

“My reason for making enquirers to you was to try and gain information on pruning my vines as I know they are in a bad state, and I have now received your wonderful book as you know and have started reading it and looking at ways to improve my knowledge and my vines. I find the book very easy to understand and would recommend it to other vine growers. I truly value your help to get me started in the right direction.
I was beginning to wonder why you do this service for free and after your comment can only appreciate what help you give me far more than you know.”

Leslie

From the UK.

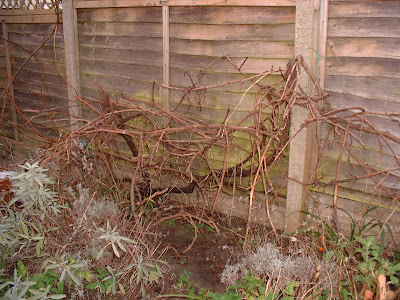
My reply to her was the picture below. Now, blogger don’t show the text on the first picture very well so I will explain what I told her.

“Leslie, remove the trunk on the left. It is difficult to see where the canes come from, but what you need to do is prune your vine with 4 to 5 long bearers (canes) and leave 4 to 5 spurs close to the main stem. It should look something like a fish bone when you are done. First, try to restore the trellis as it will make your job a bit easier. Prune the canes 8 to 12 buds long; it looks like your vine is growing way too vigorous.

Email me if you have any questions

Danie”Her reply:

“HI Danie.

Yes the pictures are great and it is something that I wanted to do original but was afraid.
………

I cannot thank you enough, but will be in your dept?

Leslie.”


Hi Danie

Hope you had a great weekend.

I have now trimmed my vine as per your drawing and instruction all that remains is to fix the wires and tie the branches back. I will take a picture for you to see as soon as I am finished.
I had to cut away some dead wood so I am just hoping I have done it all correctly, I’ve no doubt that it will sprout out whatever I have done. I have also put some of the cuttings in a container to see if I can grow a new tree.

my best wishes.

Leslie.

Being afraid to “hard prune” a grape vine is one of the reasons many home grape growers’ grape vines grow out of control.

Well, Leslie pruned her vine as I told her, constructed the trellis and in the end the results were marvelous. I received a further email from her asking why the vine don’t have fruit this year and this was my reply:

“Hello Leslie!

You pruned your vine the correct way don’t worry about that. You will have to remember one thing Leslie – the grapes a grape vine produce, comes from buds on last year’s growth. In your case, your grape vine was very compact and probably no, or little sunlight penetrated the vine during last year’s growing season and could be reason why you don’t have grapes this year.

Now, what I am trying to say is, that the shoots on your grape vine as it grows now, will be much more fruitful and you will probably have a good crop next year. We did some serious reconstructing to the vine, so hopefully this will pay off next year. As you said, the weather also plays an important role in the development of grapes bunches, so Yes, the weather could have influenced the vine as well.

Good luck
Danie”

Here is what her vine looks like now..

Why set up an arbor or trellis beforehand

How important is the construction of a trellis or arbor really? Many home grape growers use their grape vines not only to produce grapes, but to ad that something special to their garden and that is understandable, because often grapes are referred to as “the fruit of the gods”.

When the novice home grape grower first plant a grape vine, they passionately dig a hole in the first best place they can find; water the grape vine and soon see some life as new shoots develop from the tiny buds on the canes. The fact that a grape vine is VERY adaptable and not difficult to start, makes growing grapes even more fun.

Soon, the new shoots will be a foot long, and this is even more satisfying, thinking that you have successfully started a grape vine, but then the uncertainty crawls in. What now? What should I do with the new growth? Why isn’t there grapes on my grape vine? I’ve heard about “training” a grape vine, but what on earth does “training” mean?

These are common questions a new grape grower face, and it is understandable, because there is much more to growing grapes than just planting the them!

One article is excessively short to explain the whole process of growing grapes; in fact, 50 or even a 100 articles would not be enough! Therefore, I will try to shed some light on the most common mistake of all – the trellis or arbor.

After a month or so, the newly planted grape vine grows out of control and starts looking more like a shrub than a grape vine. Because of poor airflow and sunlight exposure and the fact that the new shoots is lying on the ground, even more uncertainty crawls in, as diseases starts to take over the grape vine.

Discouraged, the new grape grower tries to save the vine by pruning away shoots and then, thinking that they have successfully managed to keep the vine in shape, they will soon find out that the “new” grape vine now grows even more vigorously. The grape vine will grow even more out of control, as side shoots (laterals) develop because of the tip action that took place.

Even more frustrated, the grape grower starts to do research, desperately seeking for a solution to his/her problem. They do research in magazines, visit some vineyards and even try the Internet (as you did) seeking for answers. They find tons and tons of information on how to grow grapes, and after weeks and weeks of sifting out all the crappy information there is out there, they finally realize that they must have some kind of trellis or arbor to grow their grapes on.

Luckily, they found the answer, but there is another problem! By this time, it is almost the end of the growing season and constructing the trellis or arbor then, will do little or no good! You see, the real disadvantage of constructing the support too late, is the fact that you will have to prune the grape vine back to two or three buds and start all over again, loosing a whole year’s growth!

The real solution to the problem is constructing the trellis or arbor beforehand, before you even plant the grape vine. You should construct the support system during winter, so when the growing season starts in spring and the grape vine starts developing shoots, the support is already in place. This will ensure that you can train and evenly spread your grape vine’s shoots on the trellis or arbor wires and minimize the time it takes for your grape vine to produce grapes!

Danie
“The Grape Guy”
http://www.my-grape-vine.com/

PS: For some detailed pergola and sun trellis plans and how to construct them, you can visit

Are you picking your grapes at the right time?

Here is a short video for you.

Picking grapes at just the right time will ensure good wine and eating quality. It will also ensure an excellent flavour.

Notice the use of a refractometer, this is the quickest way you really know what the % suger is in the the grapes. Sugar content in grapes can be measured several different ways. Another handy tool that every winemaker should have is a hydrometer. A hydrometer is an instrument used for determining the specific gravity of liquids. It is usually made of glass and consists of a cylindrical stem and a bulb weighted with mercury or shot to make it float upright. The liquid is poured into a tall jar, and the hydrometer is gently lowered into the liquid until it floats freely.
The point where the surface of the liquid touches the stem of the hydrometer is noted.

A clear plastic tube that is filled with grape juice. The sugar content of the juice is measured in brix, and is determined by the hydrometer that is placed into the tube and floats in the grape juice. Take several bunches of grapes from different parts of a row and squeeze them in a plastic bag. 17 brix to 23 brix is what you are looking for, but some winemaker prefer to harvest no later than 17 brix – it is believed that this ensures a better wine flavour. It is up to you to experiment witn different brix levels, to be sure at what brix your grapes should be picked.

Here is what a refractometer looks like

You can purchase a refractometer online from Amazon.com

Have a grape (great) day

Danie

http://www.my-grape-vine.com/

Hello grape growers!

Do you know why and how you should remove lateral shoots on a young vine?
No? Okay, then this post will help you allot.
Why do you need to remove lateral shoots?
When you look at the picture below, you will notice the vine looks like a shrub with one shoot that is noticeably stronger than the rest. This is the shoot you will want to train to reach the trellis wire. Now, in order to grow this shoot (training shoot) as fast as possible, you will have to somehow channel all available energy to that shoot.
To do just that, you will have to remove all other growing points that compete for nutrients on the grape vine. In the picture below, you will see how I have removed all lateral shoots from this vine and left only the strongest, best developed shoot.
If you do this the correct way, your vine will soon look something like the following picture.
This is an ongoing process during the first year of training your grape vine and should be done weekly.
Have a grape (great) day my friends!
Danie

How to split a grape vine

Have you ever wondered how to split a grape vine to grow in two different directions? Now, you may ask: “Why should I need to split a grape vine?”.

In most trellis systems, somewhere, on one of the trellis wires, you will have to stop the vertical growth of the grape vine and stimulate lateral growth, in order to cover the all the trellis wires. When your young grape vine reach the point where you want to make the cordons or “arms” of the grape vine, you will have to somehow stop the grape vine from growing in length, so that the lateral shoots or site shoots will develop.
These side shoots will be used to make the the cordon of the grape vine and will therefore be tied on one of the trellis wires.
When your grape vine reach the trellis wire where you plant to develop the framework or cordon of the vine, you will have to remove the vertical growing point of the vine. When you remove this growing point, all the nutrients and energy of the grape vine is directed to the other growing point of the vine, namely the lateral or side shoots.

This grape vine reached the trellis wire where
the cordons will be developed.

Remember, when you remove lateral shoots from a young grape vine, always leave all the lateral shoots in an area of about 6 inches below the trellis wire, where the cordon will be developed. After you have decided what shoots will be used to develop the cordon, you can remove the unwanted lateral shoots.

This in only on simple method to develop the framework of the grape vine. The Complete Grape Growers Guide will teach you how to develop and train the grape vine from the day it is planted, until your fouth year of growing grapes.

Opening the grape vine canopy

I want to share with you a trick I use to improve the ripening & coloring of my grapes.

When you look at picture below, you will notice a gap in the growth, between the two rows (where the two slanted poles are tied together). This picture was taken at about 300mm (+- 12 inches) shoot length and is in the middle of the growing season – about two months after bud break.

In the following picture you will see that the vines covered the whole trellis system, closing the gap there was in the previous picture – we call it “the vines take hands”. As you can imagine, allowing the vines to take hands, will decrease the airflow and sunlight penetration into the vines. By now, you should know that a poorly ventilated vine is more susceptible to diseases and therefore you will have to prune away some shoots to allow a the air and sunlight into the vine.

I normally open up the vines when I see the first signs of coloring. When grapes turn color, the sugar concentration will increase dramatically over the next few week, and it is a known fact that grapes with higher sugar, will get less sunburn damage.
By opening up the canopy, you will not only improve the airflow, but the sunlight will also penetrate the vine, improving the coloring and ripening of the grapes as well. So, if you have problems with poor coloring, opening the canopy will definitely improve the coloring of your grapes.

How to open up the canopy.

When you look at the last picture, you will notice that I pruned the vines to open up the canopy. One very important thing to remember, is that you must never prune away shoots you want to use for dormant pruning during the following dormant season, especially if you cane prune. Remember, that if you cane prune, you need canes of at least 10 – 12 buds long, therefore you will have to make sure you leave enough shoot-length.

When you prune away these green shoots, make sure you remove them from the canopy!

Grape Growing Questions

Hello grape lovers!

I hope you are having a nice Easter!

I’ve received this email from Mary Holland, one of the owner’s of the Complete Grape Growers Guide. I will answer her quistens in red and please feel free to leave a comment or ask questions yourself.

BTW, thanks Mary for a very interesting email!

———–start of email—-
Hi Danie,

Short answer to your question on why I bought your book is because I am interested in starting either a wine grape nursery for northern US varieties, and/or winery, to transition my husband and me into retirement. Your book seemed to be a quick way to get answers to many questions I had. ………….

Here is a list of questions I’ve accumulated so far reading your book.

1. What do you do for weed control on your vinyard?

Mary, because my farm is 25 hectares (planted), doing mechanical weed control is out of the question. I would take far to long and labour is too expensive. I use Roundup as it has no effect on the vine when sprayed on the old wood (the stems of the vines). I do weed control 3 times a year – before sprouting, mid-season (just before berry enlargement) and once again before harvest (if needed).

On the young vines a use growing plastic tubes that I pull up just before spraying the vines with Roundup. This will prevent the Roundup from getting in contact with the leaves on the training shoots. After I sprayed the Roundup, I will let it dry off and will pull the plastic tubes down again. We farmers call these tube “grape condoms” – lol 🙂

Here is a picture of the condoms in use:


Just remember to pull down the condoms when the Roundup dried off.

2. How do you ever produce enough compost for 84 acres of vinyard?

The soil on my farm is in such great condition because of years and years of looking after it, adding organic material and manure, I hardly use compost. When I plant new vines, and whenever I feel that I need compost, I buy it from a guy who makes compost – he specialize in it.

3. What are your trellis dimensions on the vertical pole, the diagonal poles, and what’s the height of the peak where the poles meet in a gable? Are they tall enough to get a tractor under the canopies? If not, how do you handle harvest equipment?

Here is a more detailed picture of the slanted trellis system I use

4. How do you attach the poles on your trellises to each other?

See picture

5. Looks like you use wood for your trellises – if I can see the photos correctly. Do you treat these and if so how? If not, how long do they last?

Yes it is streated wooden pools, and I buy it that way. One thing I can tell you though; it is treated with tar and it last about 15 years. Whenever a pole brakes, I replace it with a new one. This is an ongoing process and I normally do trellis maintenance on all my vineyards in winter.

6. How far apart are the trellis sections (or another way, how many grapes are planted between runs of trellis supports)?

8 meteres

7. It appears you run a drip irrigation system. Do you inject fertlizer in your irrigation H20 or do you sprinkle dry on and then simply water over it?

As said in the book, I use 32litere/hour micro jets to water the vines and yes I have started to use drip irrigation as well but not open hydrophonics. This is a very specialised field and I do not recommend it for novices. I do sometimes add fertiliser through the water, but only when I see symptoms of shortages.

8. When you are working on your grapes aren’t you working with your arms over your head?

Yes. Hard work, but the best way to train table grapes – period! 🙂

9. Do you harvest by hand or mechanically? If the latter, what type of equip do you use or recommend?

Table grapes cannot be harvested mechanically because the berries may not be damaged. My people pick the grapes by hand and put it in a small crate we call a “luc”. It is then removed from the vineyard to the packshed where we pack the grapes in cartons, to export.

10. Ring barking – couldn’t quite see the pic – are you simply making a cut into the bark and cambium, or are you actually removing a strip of bark and cambium? Is it partway around the stem or all the way around? If a strip of bark is removed, how wide?

No, you must remove the old, loos bark before you make the cut. It is a about 1.5 mm cut. Here is the picture again, I hope you can see it more clearly this time. Remember Mary, ring-barking shortens the life of the grape vine. This is not recommended for the home grape grower at all!.

11. I noticed on market prices that price per ton is as much as 10 times different than other prices. The green ton prices are in the 100’s of dollars per ton; the other price is in the thousands. What does this mean, why are they so different?

The price is normally set by the variety and it will differ allot. I’m not sure how they display your prices where you live, but here is ZA, you will be paid more for a good wine variety. I hope this answer this question

Please feel free to post these q’s and a’s. I’d like to see others as well.

—————–end of email ————————–

I do agree. Grape Viner’s I would love to answer all your questions, post them in here and I will try my best to get to every single question.

Thanks again Mary, for the email. As said in a previous email, I am working on a grape growing forum, but this will take some time to get up and running. Will keep you posted.

Have a great day
Danie
“The Grape Guy”
www.my-grape-vine.com

Author of the Complete Grape Growers Guide.

Pruning Thompson Grapes

Pruning your Thompson Seedless grape vine is easy, IF you know what you are doing!

Thompson Seedless is, what we grape growers call it, unfruitful. This means that a Thompson don’t produce grapes from bud 1 to 6 on a shoot. Now, you might think: “My Thompson bears grapes on those buds!”. Yes, that is true, as this is NO rule of thumb, but it is a known fact that the fruit-bearing buds on a Thompson are between bud 8 to 14 (counting from the basilar bud on the shoot).

Normally, you prune the most of the wine grape and table grape varieties, with spurs (3 buds), but in the case of Thompson’s, you will have to cane prune (pruning with long bearers).

It is very important to prune a spur for every cane you prune. This spur is called a renewal spur, and the only reason we prune a renewal spur, is to renew the grape vine next year.

Now this might be a bit vague, trying to explain in words, so I have added some pictures found in the Complete Grape Growers Guide.

If your grape vine was pruned last year, your canes will look something link this. Notice the renewal spur on the frame of the vine. This will stay a spur until you need to use it for renewing the vine. This normally happens when the first few buds on cane of an unfruitful variety (like Thompson’s and Crimson Seedless) does not shoot (sprout).

The following sequence of images will show you how to cane prune your Thompson vine

(Sorry for the quality, but blogger blurs the images when I try to enlarge them, the quality in the

Complete Grape Growers Guide is much better)

Notice how I have removed part of the “framework” of the vine. Next year, the spur will have two sprouts again (remember, you pruned the spur with 2 buds) and the cane will have lots of side shoots again (looking like the first picture).

The whole process starts again!

With a Thompson grape vine, you must choose the canes you will use for your bearers carefully. Those thick, flat-looking canes, with long inter-nodes are normally more unfruitful than canes the diameter of your ring finger (or a bit thicker than a pencil). Choosing the wrong canes, will result in an lower yield, and you will not have enough “wood” next year to choose from when you prune.

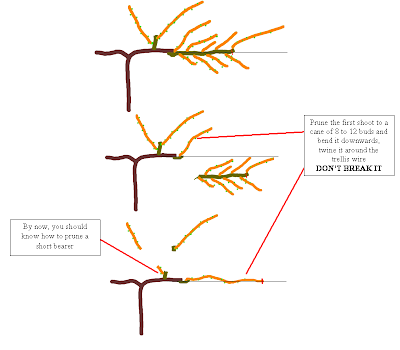
I think you realise by now, that if you have pruned your grape vine the correct way last year, the pruning effort this year, will be much easier, ESPECIALLY when cane pruning (like Thompson Seedless).

Some hints when you prune

  • Take time to look over the vine before you start
  • Pick out several well-placed canes that look like good prospects.
  • Cut out old wood and canes that are obviously unsuitable – canes that are small and weak, or too far out from the main trunk. This will clear up some of the confusion as you go.
  • Always leave at least one alternative cane until the last, in case you break one.
  • Bend canes gradually into place before tying. Canes that grow in a direction other than where you want them can often be persuaded to cooperate by cracking them gently. Use both hands to bend the cane at the point where you want it to change direction, and apply pressure just until you hear the fibers crack.

Now this is only an overview of how to prune Thompson Seedless and other unfruitful variates. The Complete Grape Growers Guide goes much deeper into the science of pruning your grape vine.

Have a grape (great) day my friend
Danie
“The Grape Guy”
www.my-grape-vine.com

Succesful cuttings made by Joel!

Hello once again my fellow grape growers and subscribers of My-Grape-Vine!

Today I want to share a fasinating story with you.

It’s about a subsciber of My-Grape-Vine.

Meet Joel (for privacy reasons I will not reveal Joel’s email adress), owner of a dwarf Merlot grape vine (shown in the picture below).

Joel joined My-Grape-Vine in mid December, and bought the Complete Grape Grower’s Guide on 21 December. After quite a few emails, here and forth, sending pictures of the grape vine, me “e-pruning” (nice word isn’t it) the vine and sending it back, Joel decided to make some cuttings from the vine.

Now, Joel lives in the USA, GA and wanted to know how to prune the dwarf vine, so I suggested what I should have done.
To get to the point, Joel made some cuttings from his vine, and with the help of the Complete Grape Growers Guide and a little personal inisiative he succeded in rooting his VERY OWN grape vines!

Well Joel, I personally wants to congratulate you again, as I know how much it means to you, and i want to share this information with all of the subscribers of My-Grape-Vine.
Here are some of the emails we send to each other. Like I always say; “Success can only be found in the actions you take!”

Here is Joel’s story and I quote this:

From Joel:

Well it’s winter time here in Georgia and I didn’t have anything to do except to attempt to root the cuttings from the Dwarf Merlot I showed you. I have not pruned it as yet but I thought it would be cool if I could root the original cuttings I had last fall. I used rooting hormone and placed the pot of cuttings between the furnace and water heater in my basement. Needless to say I was shocked at what I saw one night (See Pictures). I am planning to root the cuttings from the pruning before placing the original plant back out on my deck.

I replied, congratulating ……………

From Joel:

Hey! Hey! Yeah I’m pretty thrilled at the results. I can’t wait to prune the rest of the plant and start some more. Where in the heck am I going to put all these!!!!! LOL Like I said this started out in a pot down in the basement (dark most of the day and not heated) placed between the furnace and water heater (heated??). I placed the plastic bag over the top held by a rubber band. I would pull the bag and rubber band back slightly with two fingers and blow to inflate the bag. I watered the cuttings, from the bottom, by pouring water in the saucer that the pot was sitting in. The soil would gently take up the water and not disturb the rooting hormone like it would if you were watering from the top and allowing the water to leach thru the soil. The best thing about bottom watering is that I did not have to take the bag off every time I wanted to water it. ……………………….

Per your suggestion, I think I will move it to a brighter room. I will begin the hardening process in March prior to planting. I like the rooting platform made from wood and a 10 gal aquarium on the site you have linked from your page. I’ve got an aquarium that has been stored in the basement for years. I think I will try this method for the next cuttings.

Joel Replied:

Hey! Thanks for your time and enthusiasm! I have never met anyone on the internet that has taken so much personal interest in my success as you. It’s very encouraging to say the least. If you give all of your customers/readers the same way you will surely be a whopping success on the internet. You kind of remind me of Steve Irwin. It’s like you are the Crocodile Hunter of the Grape Vine!

Thanks Joel for the kind words, I personally loved Steve and thanks for sharing this interesting story with all of us, and once again – WELL DONE MY FRIEND!

Now, the point I want to make by posting this on my blog is:

  • After you purchase the Complete Grape Growers Guide, I will never just write you off and say “thanks, I’ve got your money, now get the hell out of my life!”. It’s more than just selling the book (by the way, YOU can sell almost anything YOU like on the internet, these days). Your success is just as important to me as it is to you.
  • I am a man of my word; whenever I can help you, I WILL try my very best. Even if it means asking someone else’s opinion (like I’ve done with Grant, another happy owner of The Complete Grape Growers Guide. Grant had some difficulty with his water quality, so I went to see an irrigation specialist in my area, to get more precise info.)

Quote from the closing arguments in the last mail I received from Grant

Thanks again Danie to you and your expert water friend, you have been very helpful. I will be ordering your book and promoting it to other grape growers in my wine region of Western Australia (Geograph).

Regards,

Grant

To all your grape growing success my friends!

Have a grape (great) day!

Danie

Author of the Complete Grape Growers Guide – teaching YOU how to make cuttings, train, prune and grow your very own grape vine!

Please leave your comments on this post,

Hi everyone,

Wow, I see it has been more than a week since my previous post!

Here is something to “tickle” your thoughts.

Many home grape growers use the same irrigation system on their grape vines as on their lawns. Decide for yourself if it is wise or not …

Any form of irrigation normally helps the start and spread of nematodes and fungus diseases, but not all irrigation methods has the same effect. Normal sprinkle and drip irrigation will not have a huge effect on the spread of the diseases, if not applied directly on the leaves of the vine.

There are a few factors that influence the effect irrigation has on the spread of diseases. The interaction of the climate created by the water, the pathogen involved, and the grape variety will influence the spread of the disease.

During irrigation, the microclimate surrounding the grape vine, changes. The water reduces the air temperature, especially when sprinkle irrigation is used. The humidity around the vine, increase due to evaporation of water and it is a known fact the increase in humidity will increase the chances of spreading a fungus disease. Watering a grape vine, will increase the vigor of the vine, as we all know and a more vigorous vine will overshadow bunches. It is found that shaded bunches will be more susceptible to grey rot than bunches in direct sunlight, because the circumstances for spore development and spreading is much better.

The presence of downy mildew during the late summer in countries like Australia and South Africa, is mainly because of the effect irrigation has on the micro-climate surrounding the vine, therefore, you need to sustain your fungus spray program as late as possible.

There are three cycles in the life cycle of a fungus; sporation, spreading of spores and finally the germination and establishment of the spores. A fungus disease like downy mildew needs “free water” for the sporation and establishment of the spores to take place and the water drops of sprinkle irrigation or rain, can spread the spores. The germination then takes place when the climate conditions are ideal and spores will form shortly there after. The whole cycle starts over again and this within 48 hours! Nevertheless, with enough spores present, free water and an ideal climate, this disease will spread like a field fire.

When we look at nematodes, very little grape growers actually know the levels of dangerous nematodes (there are good ones present as well) in their soil. Nematodes damage the roots of the grape vine by attaching itself to the roots and sucking juice from it. This will prevent the roots of the vine to function normal. Nematodes can also cause secondary virus infections like fan leave.

In previous years, farmer from California increased the amount of water they give, to compensate for the loss of water and nutrition uptakes, due to fact nematode damage of the roots of the vine. This had a snowball effect, as more water will spread nematodes much quicker. Nowadays, a more regulated watering schedule and the chemical and biological removal of nematodes decreased this problem dramatically. When planting new vines, make sure your soil is free of nematodes, otherwise your vine will never be a healthy vine.

To conclude this article, I want to urge you to never use overhead irrigation (if possible) on grape vines. The disadvantages of using this irrigation system are so many; it will never justify its use. Rather use a drip or micro irrigation system that will not spray the shoots and leaves of the vine.

When fungus diseases are a big problem in your area, try to water your vines very early in the morning or during the evening. This gives the vines time to dry off, before the temperatures will rise to levels where fungus diseases will spread.

 Page 7 of 9  « First  ... « 5  6  7  8  9 »