The Importance Of Oxygen In The Soil When Growing Grapes

In the previous blog (Watering grape vines) we spoke about what instruments you can use to determine the amount of water needed by the grape vine.

As mentioned in the article, you should maintain a good balance between the amount of water and oxygen in the soil, to ensure proper root development.  In this article, I want to discuss this point in more detail.

Soil is made up of both organic and inorganic substances. 

The organic matter consists of the decomposing rests of plants and animals and with and ideal soil temperature and moisture levels, the soil is inhabited by earthworms, insects and fungi. 

These living organisms, along with other plants, feed on the organic matter in the soil, that will in the end create humus and soluble nutrients.   This biological cycle continues as long as there is moisture and oxygen present in the soil.  This decomposing matter aerates the soil by occupying the gaps between the inorganic soil particles, increasing its water holding capacity.

The inorganic particles of soil are named by the size of the particle; sandy soils have the largest particles and clay, the smallest particle.

The moisture/water in soil from irrigating your vineyard will penetrate the soil through cracks and gaps between the inorganic particles in the soil.  This process will push the air out of the soil as air and water cannot use the same space.  Plant roots need oxygen to breathe and without the presence of enough oxygen, they plant will drown.

As the organic material decomposes, it will release carbon dioxide, which replaces some of the oxygen. The water in the soil dissolves the carbon dioxide, forming a weak acid, which, by reacting with the minerals in the soil forms compounds that the plants can use as food.  Therefore, oxygen is needed in the soil!

Plants also need nitrogen, which they cannot get directly from the atmosphere.  A complex process called nitrification takes place to make nitrates available to the roots of the grape vine – this is a vital stage in the nitrogen cycle.  As you can imagine, without air in the soil, this process cannot take place.

Plants also use oxygen for the respiration processes in their cells, which are the main source of energy for the plant – their metabolism running.  Grape vines are not very well adapted to withstand too wet conditions for prolonged periods of time; so over watering your grape vine in fact halts/slow down the metabolism of the grape vine.

Remember, when you plan your vineyard, it is good practice to correct the drainage and organic content of the soil, BEFORE you plant your grape vines. 

New To Growing Grapes | Watering Grapes


How much water is enough?” or “How often do I need to water my grape vine?  is one of the most asked questions by home grape growers.  This is also one of the most difficult one’s to answer, because there are so many outside factors that will play a major role in deciding how long and how much to water your grape vines. 

Factors like your climate, soil type, soil drainage, wind speed, rainfall, topography of your vineyard, quality of the water, the irrigation system you use and even the canopy size of your vineyard will influence how much you will water your grape vine.  I’m sure you will understand, that for me to tell you exactly how often to water a grape vine, is very difficult.  I can only give you an estimates, but you need to experiment and test how much is enough.

To give you an example; during last years’ growing season, one of my friends called me to ask how much I water my Thompson Seedless grapes.  I told him the frequency and duration of my irrigation schedule, but decided to go and visit him.

When he took me to his vineyard, I immediately noticed that his soil type was totally different from mine (more sandy), his vineyard was ridged because of impenetrable sub-soil layers (ridging will cause water to evaporate more, because of the greater soil surface) and his row spacing also differed from mine.  I advised him (or should I say we came to an agreement) that he needed to water his vine more frequently but for shorter periods of time.

In the end, he nearly gave the same amount of water as I did, but his scheduling was very different from mine – by the way, he had a great crop that year.

Increasing the efficient usage of water in vineyards should be the goal of every grape grower on planet earth, as water is becoming more scares each year – global warming??  Therefore, the correct timing of irrigation and application of the correct amount of water are important to maximise crop production and irrigation efficiency.

Let’s look at what tools you can use …

Measuring available soil water in vineyards:

Class A evaporation pan:


Class A Evaporation pan, is cylindrical with a diameter of 47.5 ” (120.065 cm) and has a depth of 10 ” (25.4 cm). The pan is mounted on a level, wooden base and is often enclosed by a chain link fence to prevent animals drinking the water from the pan.

The Class A Evaporation pan measures the amount of evaporation (the process by which water is converted from its liquid form to its vapour form) that took place during a single day as the depth of water (in inches) evaporates from the pan. The measurement day begins with the pan filled to exactly two inches (5 cm) from the pan top. At the end of 24 hours, the amount of water to refill the pan to exactly two inches from its top is measured.  Off course nowadays, there are fully automatic systems available, that takes the readings, store it in a database or even send the it via cellular phone to the farmer – it even refills the pan by itself!

Anyway, the measurement you take from “reading” the amount of evaporation is then used to calculate the evapotranspiration from the soil, grape vines and cover crop.

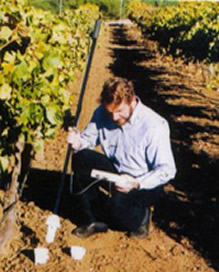
Tensiometers or Irometers:


A tensiometer is an instrument that reads the soil water potential (the direct energy needed or availability of soil water to the plant) and consists of a porous ceramic tip (cup), connected through hard plastic tube to a vacuum gauge – they come in different lengths.   The tube is filled with distilled water and sealed at the top.

The tensiometer is placed into the soil, in the root zone of the grape vine – the porous tip, acts kind of like a root.  When the soil dries out, the pressure on the outside of the tube will decrease and an imbalance between the inside and outside of the tube will occur.  In order to equilibrate the pressure, water will move from the tube, through the porous tip into the soil.

As the water moves from the tube into the soil, it will cause a vacuum inside the tube and the vacuum gage will show a reading in bars or kilopascal.  Off course, when you water the vine again, the pressure inside the tube will be lower than on the outside and water will move through the porous tip, back into the tensiometer, lowering the reading again.

On the gage, 0 = fully saturated soils and 100 = extremely dry soil.  One big disadvantage of using a tensiometeres is they need constant servicing as air is extracted from water under tension and becomes trapped within the tube, reducing the response time progressively until the instrument fails to operate.


Diviner 2000:


The Diviner 2000 is a portable soil moisture probe, designed Sentek in Australia.  At each site, a probe tube is installed into the soil and when you want to take the readings, simply slide the probe down the tube, into the soil.  The encapsulated capacitance sensor then measures the soil water of the root zone at different depths.  The data is transmit to a handheld logger, which shows graphs of the available water in the soil.  You can also connect it to your PC and download the data.  With the software provided, it draws graphs of water usage at different levels, making irrigation scheduling much easier.


DFM Probes:


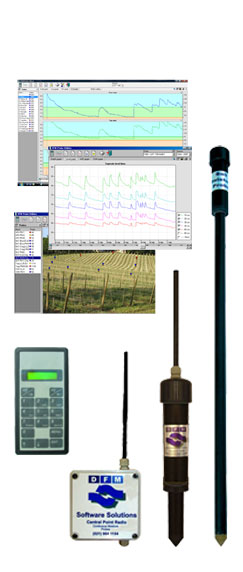
I started using these probes last year, and must say, it is AMAZING what you can do with it!  The DFM Continuous Logging Probe is a multilevel soil water content and temperature logging device.  The progressive, newly upgraded probe takes readings on 6 depths and at hour intervals and stores it locally for up to 60 days. Data can be downloaded to a mobile logger or to a central computer with the use of 1.2km long distance radio model.

In other words, you don’t have to visit the site where the probe is installed if you have a radio model!  On my farm, the sites where the probes are installed is relatively far apart, so this makes the job much easier.  You can visit their site at http://www.dfmsoftware.co.za.

Practical tips for the home grape grower:


Even with all of these instruments (and there is hundreds more on the market) to our disposal, you should always physically test your soil water level.  You can do this digging a hole 2 feet away from the vine, about 2 to 3 feet deep – this is where most of the roots of a grape vine situated.

From the bottom of the hole, take some soil in your hand and press it as hard as you can …


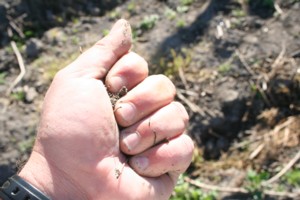
If you open your hand and the soil particles stick to each other like a mud-pie, and you feel your hand getting colder (transpiration of water), you know there are still free soil water available in the soil.


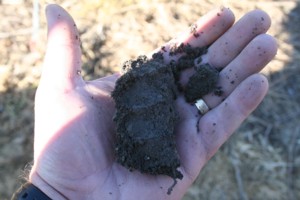
If the soil kind of crumbles after opening your hand, and you feel no transpiration of water, then most of the time, your soil is to dry and you need to water your grape vine.


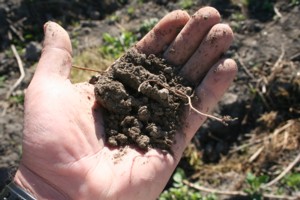
With the help of the above instruments and physically testing the soil this way, you can easily build knowledge of how wet your soil really is when say for example a tensiometer reading is 30 cu.  I do advise you to do regular physical tests.

I hope this article will help you water your grape vine more efficiently in the future.  Remember, a too wet soil has too little oxygen needed for normal root functions – grape vines hate wet feet!

Layering A Grape Vine

Layering a grape vine:

In this article I want to share a neat little trick grape growers use to propagate new grape vines in established vineyards.
 

If you have ever tried to replace dead or weak grape vines in an established vineyard, I am sure you will agree that is a daunting task.  You normally struggle to get these new vines to the trellis wires because of competition for food and water and because of over shading from the existing vines in the vineyard.

Although it is always advisable to try and replace dead vines with new ones, there might be times when you don’t have new vines or if you failed to grow a new vine, then you can use a simple method called “layering”.

Layering a grape vine – How To:

Layering a grape vine is done in the dormant season, when you prune your grape vines.  All there is to layering a grape vine, is to make a new planting hole where you want to establish the new vine and then take a cane from the existing vine, bend it down towards the ground and loop it inside the planting hole for about one foot and then up again.   To keep the cane in place, before you fill up the planting hole, you can put a stone on the cane and then cover it with soil.

layering a grape vine

After layering a grape vine, you will soon see new shoots starting to develop from the layered cane!

New shoots after layering a grape vine

 From there you train the grape vine exactly as if it is a newly planted vine.  During spring, new shoots will develop from the buds on the layer.  If you have the Complete Grape Growers Guide, then train a new training shoot exactly as I show you in the guide. 

Anyway, roots will develop from the buds that are buried under the soil and your new vine will get its food from the existing vine, until the roots of the new vine are strong enough to support the grape vine.

After a year or two, some growers remove the part that is coming from the existing vine, but I prefer to keep it until I am sure the new grape vine is well established and producing a crop.

The disadvantage of using layering is that your new vine will have no rootstock and could be more susceptible to soil diseases like Phylloxera and nematodes – off course it depends on how susceptible your variety is to those diseases.

New To Growing Grapes – Disease Control On Grapes

Hi grape growing friends, here is a further update in the series of “New To Growing Grapes” and this time we will talk about disease control on grapes.


I am sure most of you who grow grapes, have some time or another come across some kind of disease on your grapes.  Not knowing what to look for and when to expect diseases like powdery mildew and downy mildew infections, it’s the reason why so many people fail to have any grapes on their grape vines!


Not only fungus diseases, but also bacterial diseases and insects on your grape vine, will directly influence the quantity and quality of your grapes and because not many grape growers know the symptoms of these diseases, most of the time they wait too long to take action.


The problem is; when you can clearly see the symptoms of diseases on your grape vine (on the shoots, leaves and grapes), it is often too late and 70 % of the damage was done!  Therefore, it is better practice to take precautionary measures, than to try and solve the problem when it is visible.


Grape vine canopy management to control diseases:

Controlling diseases and insects starts with a proper canopy management and grape vine manipulation in conjunction with a sound and ongoing occurring spray program.  Those of you who owns the Complete Grape Growers Guide, will recall how often I mention sunlight penetration and airflow into the grape vine and the importance of a well balanced grape vine.


Most fungal diseases need humid, hot condition and the existence of free water to spread; therefore grape vine canopy management is of the utmost importance when you grow grapes.  Proper airflow and sunlight into the vine will help to reduce the time it takes for grape vines to dry off after heavy dew or unwanted rain and therefore reducing the time the fungus has to develop.


Controlling diseases on grapes is much harder in tropical climates, because the higher humidity and rainfall in those areas, will make the inoculation and the spread of fungus diseases much quicker.  Canopy management in these areas is critical!


Another cultural practice to help control diseases of grapes, is a properly set up trellis system.  The trellis I use on my farm (the gable trellis system), allows the grape vine to spread its shoots and cover the whole canopy area, making the grape vine less compact – better airflow and sunlight penetration!  If you plan to start a vineyard, choosing the right canopy system is VERY important.


Resistance of grape varieties:

It is a known fact that some grape species and even some grape varieties are more resistant to diseases than other.  Take for example muscadine grapes (Vitis rotundifolia), it is a native grape species found in the southeastern United States and grows wild throughout North Carolina. 


Although Muscadines are not nearly as productive and lovely to look at, as V. labrusca or V. vinifera, it can survive in areas where other grape species will never survive!  Note I use the word:  “can”.  Planting or growing muscadines will not safeguard your vines completely free from diseases, but it can help if you live in an area with high humidity and unpredicted (unwanted) rain.


Another example is Flame Seedless and Crimson Seedless – two very popular varieties throughout the world.  I grow both of these varieties my self and I can tell you from experience, that although both are red seedless, V. vinifera varieties, Flame Seedless is much more susceptible to berry rot and berry crack after rain, than Crimson Seedless is.  On the other hand, Crimson Seedless is more susceptible to powdery mildew than Flame Seedless is.


As said in an earlier blog post, you need to carefully choose the variety you will grow in your climate and/or area and I hope this article gave you some tips when you are new to growing grapes or if you are planning a new vineyard.


Remember one very important thing:  


DISEASE CONTROL STARTS WITH PROPER GRAPE VINE CANOPY MANAGEMENT!

Take care and good luck.

Danie


New to growing grapes?

From the tons of emails I receive at www.my-grape-vine.com, there seems to be many newcomers to growing grapes each year.  Most of them struggle with more or less the same problems and ask me the same questions.  I’ve been trying to reply to most of them, but surely cannot reply to all – there is just so many hours in a single day. 

I’ve made a list of what the problem areas are, when you are new to growing grapes and will briefly discuss each of them over the next couple of weeks.  I cannot go into too much detail about each of them, that is why I wrote the Complete Grape Growers Guide off course J. but I will try to shed some light on a few problems areas. 


Okay, let’s have a look at what new grape growers find difficult…

  • Pruning 

It seems like pruning grapes is still the number one headache for new grape growers.  The fact that pruning is one of the most important manipulations of growing grapes, and that so many people do not understand or know how to prune grapes, is why so many new grape growers tragically fail.  I get the feeling that people don’t realize how important pruning really is!


You must have some sort of structure or plan you follow each year.  Most new grape growers just randomly cut off canes to make grape vine smaller – big mistake!  What is very important to remember is; a grape vine reacts to the way you prune. 


In other words, if you prune for fruit, you will have fruit; but if you prune for shoots, you will have only shoots!  The “self-taught pruning methods” of new grape growers are normally “to prune for shoots” and that is in most cases why their grape vines do not produce grapes!


Developing a pruning method or structure, start the very first year of training a grape vine.  Without developing the framework of your young grape vine will make pruning much harder in years to come.


We develop what we call cordons or arms, with spurs (short bearers) situated on the arms to be the fruiting zone of our vines.  You cannot simply cut canes left and right, and expect your vine to produce grapes – it simply doesn’t work that way.  In most cases, if you get your pruning done properly, your grape vines will produce grapes.

  • Training

As said earlier, the key to having a productive grape vine starts with training a grape vine from year one.  Many new grape growers just plant the grape vine and then expect it to climb to the trellis or arbour by itself.  Although sometimes this happens, it is not the ideal way to train a grape vine.


You need to make sure that you train only one training shoot the trellis or arbour – if you prefer to have two main stems one day, then train only two shoots to the trellis.  Your vines will reach the trellis or arbour in half the time – I promise.  The methods I use and explain in the Complete Grape Growers Guide, get my grape vines to the top of ANY trellis within one year.  The second year I develop the framework and then BOOM!!! Tons of grapes!  The key is – “Train your grape vine with one goal in mind – to reach the trellis wire in year one!”

  • Soil pH

The third most asked question is about the pH of the soil.  Strange enough, but so it seems, new grape growers are more concerned about soil pH than about planting the correct variety and training the vines.  Don’t get me wrong, soil pH is very important, but just as important is planting a variety that suits your climate, suits your needs and suits your soil type.


To answer the pH question; grape vines can grow in a relative wide range of pH soil. The best pH for growing grapes is slightly acidulous; between 6.0 and 7.2, although you can go as low as 5,5 and as high as 7.8.   Soil with a pH outside these ranges are not suitable for growing grapes – or should be corrected first. 


Hope this gives the new grape growers some guidance to where they should focus their attention on. 


Take care,

Danie

www.my-grape-vine.com

Japanese beetle update – amazing!

This is an amazing video that makes allot of sense.  Maybe if some you can try this out to see if you can stop Japanese beetles from attacking your grape vines.

Would love to hear your comments!

Take care

Danie

What to do about new growth on a grape vine

Hi grape growing friends,

I received this email from John and Randi, so I decided to reply to their email on my blog so everybody can have a look at it.

Here’s the email:

What to do about the new growth? I think about 20 bunches/plant is recommended, under the best circumstances, either red or white varieties. Do I pinch back the new growth at the mature stem, pinch back below the lowest bunch (I assume the plant needs leaves to produce nutrients for the grapes), let the new growth continue – removing only the bunch buds: how to balance roots with fruits?

OK here we go …

Although John and Randi didn’t mention the age of their grape vines in the email, I assume it is mature vines. New growth on a grape vine is easily managed by starting to remove water shoots.

Water shoots (as I call them) are shoots that develop from the old parts (arms and stems) of the grape vine – older than 2 years. These shoots normally do not produce grapes and only compact the vine and prevent proper sunlight penetration and air flow. Although water shoots can be used to renew a cordon (arm) when a cordon dies or become unfruitful, they are normally useless on a grape vine and should be removed.

Determining the crop size you want on your grape vines beforehand, is important and you should experiment with your own vines to see what the best load for optimum quality is.

Depending on how strong your grape vines are and off course the trellis system you use, 20 bunches per vine (like in the email from John and Randy) is okay, but with a well developed grape vine structure, good exposure to sunlight, correct bunch sizes and proper canopy management during summer, I succeeded in ripening up to 32 bunches per vine.

Some “grape growers/consultants” might tell you that this kind of crop sizes will result in lower quality grapes. Yes, that is true IF you do not look after your vine. I successfully prepare and pack grapes crops of this size year after year.

Now you might think: “What a windbag this guy is?” No, actually I’m no windbag, in fact I’m a rather quiet guy!

I’m telling you this because it is possible to grow grapes that produce that kind crop sizes. By removing all unnecessary shoots on the grape vine before flowering and even by reducing the number of flower-clusters at that stage, will unbelievably improve the quality of your grapes.

Like I said, decide on the crop size and count the number of bunches before flowering starts. Here is the formula I normally use.

Say for instance I decide on a crop size of 30 bunches per vine, I then ad 60% to that number

30 bunches + 60% = 48 bunches per vine (the rest will be removed after fruitset, when you will be able to choose the 30 best bunches from the total)

If I have say 70 bunches on the vine at that stage (which is possible!), I will remove 22 of those bunches. I start by removing inferior shoot, even if they have bunches on them. I remove all double shoot that developed from the same bud (remember that a bud on a grape vine is actually 3 buds combined) and then I remove individual clusters from shoot that produced more than one cluster per shoot.

KEEP ON COUNTING THE GRAPE CLUSTERS AS YOU PROCEED!

Once I’ve reached 48 clusters, the grape vine is now ready to go into flowering.

You see my friend …

By removing unnecessary clusters before flowering, the vine is under much less stress – when the clusters start flowering, the grape vine is under an enormous amount of stress.

I never remove leaves at that stage. Rather leave the grape vine until after fruit set and then remove leaves. If you feel that some of the shoots is growing out of control, you can set them back by removing the growing point of those shoots.

I tried to explain this in simple terms, so I hope this will help you grow your grape vine the correct way.

Good luck and if you have any questions, just add a comment below this post.

Take care

Danie

The Grape Guy


Because we cannot see the roots of the grape vine without digging into the soil, many grape growers often make the mistake of not ensuring a well balanced, properly formed root system of the grape vine.

Tests have shown that a grape vine with well developed and well distributed root system contains lots of fine roots. These fine roots are responsible for the uptake of food and water, which will ensure a well developed canopy throughout the season. It is a known fact that for a good eating quality grape or a good quality grape for wine, active growth during the ripening of the grapes is essential.

A grape vine with an underdeveloped root system, especially fine roots, has a poor buffer capacity against unfavorable conditions, like drought, heat waves and even unwanted rain. The absence of these fine roots will result in less young leaves to form or develop throughout the season.

There must be a proper balance between old and newly formed leaves on a grape vine, because young leaves continue to feed the grapes and the root system of the vine. When an imbalance occurs, the grape vine goes into “stress” and will not be able to sustain the composition of the grapes during the later stages of ripening.

In short; the root quality and quantity of a grape vine is essential for good quality grapes, therefore proper soil preparation and the correct chemical substance of the soil must be determined and corrected before you plant the grape vines.

Without any doubt, there is a direct correlation between the canopy development and quality of the root system and in the end the quality of the grapes and wine.

Ensuring a proper root system, will make canopy management easier and your grape vines will not easily go into “stress” when unwanted climate and external conditions occur.

Have a grape day!
Danie
“Author of the Complete Grape Growers Guide”

Merry Christmas To You All

Hi grape growers.

Can you believe that it’s Christmas again. Last year, the same time, we were a small community of grape growers, but since then grew exponentially!

Thanks for being part of the My-Grape-Vine experience.

A merry Christmas and lots of blessings to you.

Danie
The Grape Guy

Razak’s grapes in the tropics

Hi Grape Viners.

I would like to show you some pictures of grapes from a subscriber in Malaysia (tropics). Razak, is doing a fine job growing grapes there! Remember, there is no dormant season in Malaysia, so they have to “force” dormancy by removing leaves, stop fertilizing and watering the vine a month before their dry season and as soon as they are ready, they will “kickstart” the vine by start watering and feeding the vine again.
Growing grapes in the tropics is not easy, I promise you, so Razak is doing a fine job!
Well done my friend!!
Did you know it is actually possible to have to grape crops per season in the tropics!


Here is the email he send me:

“Dear Sir,

1. I would like the express my gratitude and thanks for
being able to get informations and guidance about
grape growing from your blogs.
2. Actually sir,I am from Malaysia, a peninsular
country between Thailand and Singapore. We are in
such a pure tropical atmopheric country and never have
been experiencing grape growing. It is just for the
fun in planting fruit trees in the garden that led me
read a lot of articles on viti culture.
3. After 3 years I began to see the bunch on my
vines. Yes those are my grapes but not as sweet as
what I use to buy at the supermarkets – the imported
grapes.
4. You can see my vines which I grow on the belcony
of my small house with the backdrop of coconut and
banana trees. MY TROPICAL GRAPES.


Your articles have been most helpful.
Thank you sir.
 Page 6 of 9  « First  ... « 4  5  6  7  8 » ...  Last »